This tutorial was written by me on 09/07/2015 and assumes you have
working knowledge of PSP. Any similarities to other tuts is purely
coincidental and not done on purpose.
For this tut you will need:
PSP - I use version X3 but most versions will do
You can purchase both tubes and kit from
CDO
Do not use without purchasing a license first
Font of choice, I used Carl Beck Script
Eye Candy 4000 gradient glow
Let's begin. This tag has a lot of layers. It's very important that you save often as you go.
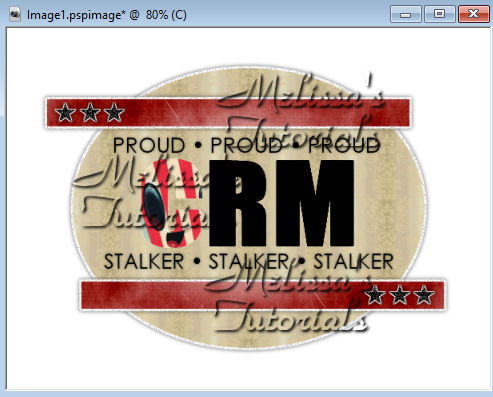
Open your template in psp. Duplicate and close the original. Delete the credits layer. Unless you're going to be using Rac tubes, delete the xeracx layer. You're going to put the artist's name on there that you're using. For my example tag I'm using Cuddly Rigor Mortis, or CRM for short. You need to be sure you have as many tubes as the letters of your artist's name, plus your main tube, unless you wanted to repeat one of the tubes.
Click on your text tool. Font is Impact, it's a windows font so it should be already on your computer. Foreground and background black, stroke 1. Size 100. Click in the center of your template. In all Caps, type out your artist's name. Align center of your canvas. Using the vector nodes, drag your name larger if needed. When you're satisfied with size and placement, convert to raster. Rename this layer the name of the artist.
Activate your white background layer. Increase canvas size to 603 x 451. Flood fill the empty parts white again.
Activate the shape layer. Select all, float, defloat. Copy a paper of choice, I used paper 5. Paste as a new layer. Invert selection and press delete and deselect. Delete the original shape layer.
Activate the thin rectangle2 layer. Copy and paste another paper of choice. I used paper 6. Resize the paper layer so it's just a little bigger then the rectangle is wide. I resized mine 60%. Make sure all layers is unchecked. Align the paper up with the top rectangle so the part of the paper you want to show is covering it:

Activate the rectangle2 layer again. Select all, float, defloat and invert. Activate the paper layer again and press delete and deselect. Duplicate the paper layer. Mirror and then flip. You might have to arrange it a bit so it covers the bottom rectangle. Your duplicate paper layer should be on top of the original paper layer in your palette. Merge down 1 time and delete the 2 original rectangle layers. It should now look like this:
Activate the stalker layer and move it down in the layer palette so it's above the proud layer. Merge down 1 time. With this layer active, click on your Manual Color Correction tool. We're going to change the pink of the text to a color to match our main tube. So your source color is the pink. I put the color code on the screenshot below. The target color is the color your changing it to, I used black.
Activate the while background layer. Select all. Crop to selection to get rid of any paper that might be off canvas.
Activate shape layer again. Select all, float, defloat. Expand selection by 3. Add a new raster layer and flood fill white. Deselect and move the white layer under the shape layer. Add noise at Uniform, 50%, monochrome checked. Give this layer a drop shadow of 0, 0, 60, 8.
Activate the layer with the 2 rectangles and repeat as above.
Activate the stars2 layer. Merge down 1 time and rename stars. Add noise to the stars but this time at 100%. Select all, float, defloat. Expand by 2. Add a new raster layer and flood fill white. Deselect and move the white layer under the stars layer. Give it the same drop shadow as above. Activate the layer with the proud stalker lines and give them a drop shadow of 0, 0, 50, 5.This is what you should have so far.
Have you saved your progress? Do it now, cause now it's about to get harder. Activate the artist layer. Copy and paste all of the tubes that are going to go within the names as new layers. Resize each down so they're about the size as the parts you want in the letters. To make sure they're where you want them, select all, float, defloat. Then you can move them where you need to. If you need to resize 1 or more, deselect, resize as needed and then do the selections part again just to see if it's where you want it. So when you're done it'll look kinda like this.

Now deselect as we're going to add each tube one at a time to the letters. So hide the tubes that are going to be in the letters. Activate the artist layer again. Mine is labeled CRM as that's the artist I'm using. Select your magic wand with match mode at RBG value, tolerance and feather at 0. Click inside just the first letter. Unhide that first tube and activate it. Invert selection and press delete. Deselect and rename this layer the matching letter. So for mine, it's the letter C so that's the name of this layer with the tube.
Activate the artist layer again. Click inside your second letter with your magic wand. Again, unhide and activate the tube you arranged for that layer. Invert selection and press delete. Deselect and rename that layer the matching letter. Continue doing this for each of the letters and matching tubes. When done it'll look like this:
And your layer palette should be like this:
Now, hide just those tube letter layers, so for me it's the top 3 layers. Invert view and merge visible. Change view back to all. Rename this layer tubes:
While still on the tubes layer. Select all, float, defloat. Go up to selections, modify and click on Set Selection Borders. Border width is 1, both sides ticked and anti-alias checked. Add a new raster layer, and flood fill with a complimentary color to your tubes. I chose black. Don't forget to get the little parts inside letters like O, P and R. I missed that on my original tag. lol Deselect when done and activate the tubes layer again and give it a drop shadow of 0, 0, 80, 12. You can now delete the original artist name layer.
Make sure the top layer in your palette is active. Now it's time to start adding some elements from our kit. Copy element 22 and paste as a new layer. Resize 65%. Arrange how you like it. I put mine so the knot in the string is in the middle of the R. Give it a drop shadow of 0, 0, 60, 5.
Copy and paste element 14 from your kit. Mirror if needed and resize down 30%. Arrange so it's sitting on the corner of the top rectangle. See my tag for reference. Give it the same drop shadow as the string. Add any other elements you like, being sure to drop shadow each one.
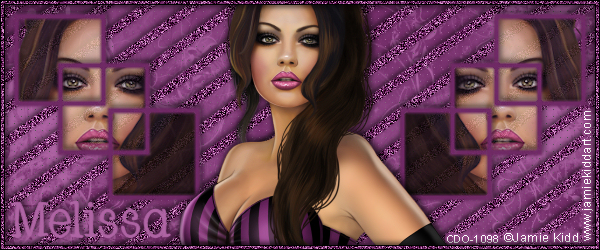
Copy your main tube and paste as a new layer. Make sure it's on top of your layer palette. Resize if needed, I resized mine down 63%. Arrange on tag where you like it. Give it a drop shadow of -3, 3, 50, 10. Repeat the drop shadow but this time 1, -1, 40, 5.
Activate the white background layer. Copy and paste a paper of choice, I used paper 2. Add mask from image and merge group. Use your raster deform tool to move and drag out if needed so it shows evenly on your workspace. See my tag for reference.
Now if you're going to resize your tag, now is the time to do it. I resized mine 80%, all layers checked.
Now hide the main tube layer for now and activate the string layer. We're going to weave it in and out of the letters and parts of the template. Zoom in about 300% so you can easily see what you're doing.
Using your selection tool, select around a part you want to go underneath part of the template or letter. Make sure you allow for the drop shadow on the string so you don't chop any parts off:

Promote to selection, activate the original string layer and press delete. Move the promoted layer under the template part you want it to be under. So it'll look like this:
Doing this to the letters is a bit more difficult. I'm going to put the part of the string that goes over the C underneath it. So we'll do the same we did before so when we're done it looks like this:
Continue doing this until you have the string woven throughout the tag. See my tag for reference.
Activate the mask layer. Crop layer opaque. Make sure you don't crop off any parts of the main tube, template or drop shadows. You can delete the white background layer now. Activate and unhide your main tube. Add your copyright, license and tagger's mark.
Now's a good time to save a copy of your tag for your blank if you're going to be making tags for others. Just be sure when you add your name you're not doing it on the original file.
Add your name using colors from your tube(s). Give it an inner bevel of choice. I used this one:
Then give it a gradient glow. Normally I'd just do a simple white glow but it just didn't work with these colors so I used this one, with the glow width at 3:
And finally give your name a drop shadow. I used 0, 2, 50, 5.
Merge visible and save as a png or merge all and save as a jpg. Congrats, you're done!
Here's a 2nd example. This was my original tag that I did. I remade my example tag as the kit used for this tag is the
PUT Bundle pack 223 and so the kit can ONLY be used with PUT tubes. The font used for this tag is Copper AltCaps.