Tuesday, July 30, 2013

Old School Forum Tut - Weaved Beauty


Hello everyone. I have a new exclusive tut over at Creative Addictions. This uses the art of Jasmine Becket-Griffith, which you can buy at CDO
Remember, you don't need to be a member of CA to view my exclusive tuts and even guests can post their results on the threads. I loved to see anything you make from any of my tutorials.

Sunday, July 28, 2013

Lots of Avatars!

It's been awhile since I shared any new avatars with you all. You can find them all here. All the new ones are shown below.


Saturday, July 27, 2013

PTU Tut - Showtime


This tutorial was written by me on 07/27/2013 and assumes you have working knowledge of PSP. Any simularities to other tuts is purely coincidental and not done on purpose.

For this tut you will need:

PSP - I use version X3 but most versions will do
Xero - Porcelain
Eye Candy 4000 - Gradient Glow
Tubes of choice - I'm using the artwork of Leonida Preda. You can buy them from CDO. Do not use these tubes without purchasing a license first.
Scrapkit by Ladyhawwk Designs. This kit is part of a Bundle Pack goes with this Pack 4 and can only be used with this artist's tubes from CDO.
Mask of choice, I used Mask 30 from Insatiable Dreams. It's in the 3rd mask collection.
Font of choice, I used Caswallon Demo.

Open a new workspace 750 x 700, flood fill white. Open your mask and minimize.

Copy Frame 1 and paste as a new layer, rotate to the right 90 degrees and resize by 80%. Sharpen 1 time.

Click inside your frame with your magic wand. Expand by 13. Copy a paper of choice, I used paper 10, onto your workspace. Invert selection and press delete. Move the paper the paper under the frame layer. Do not deselect yet. Copy your main tube and paste onto your workspace. Arrange her in the frame as you like. Duplicate this layer and make sure one layer is under the frame and one above it. Activate bottom tube layer
and press delete. You may now deselect.

Activate the top tube layer. Apply Xero Porcelain with the following settings:


Give it a drop shadow of -2, 3, 50, 10. Then repeat the drop shadow with 1, -2, 50, 5. While we're at it, let's give the frame a drop shadow of 0, 0, 100, 10.

Now make sure your top tube layer is active and we're going to temporarily lower the opacity to about 50. Grab your erasor tool and let's zoom in about 400%. We're going to carefully erase any of the top tube that sets above the bottom part of the frame. Make sure that you erase enough so that the shadow from the frame shows on the tube. Here's an example of part of it that I've erased:


When you're done, return the opacity to 100% but stay zoomed in. Now you can hide and unhide the layer a few times so you can see if you missed any pixels that need to be removed. When you're satisfied you can zoom back out to 100%.

Now open up Element 55. Duplicate and close the original. For some reason it has a white background, but we're going to get rid of it. Click on the white area outside the film strip with your magic wand. Make sure you get it all selected. I had to click down at the bottom on mine to get it all. Once it's all selected, hit delete and deselect. Now click on each of the grey squares inside the film strip and remove them like you did the white border. Resize by 70%.

Using your magic wand, click inside the boxes that were grey before. Expand by 3. Copy and paste a paper of choice, I used paper 8. Invert selection, press delete and move this layer under the strip. Deselect.

Ok with the paper layer still active, we're going to work on just one box at a time adding tubes to it. Copy one of your tubes and place her where you want her within the first box. Resizing if necessary. If you want to use the same tube just duplicate and move the dup layer to where you want it in the next box. Keep duplicating or adding new tubes till all all 5 boxes have some part of a tube in them. Now hide all tubes
but the first one and activate the strip layer. Click inside the box with the tube and expand by 3. Invert, activate that tube layer and press delete. Deselect. Unhide the next one up. Click inside the 2nd box with the magic wand and repeat what we did before. Keep doing this till you have all 5 done. When done you'll have something like this:


You can now copy merged and paste the film strip onto your workspace. Rotate 45 degrees to the right. Sharpen 1 time. Arrange over the top right corner of your frame and move this layer below the the top tube layer. See my tag for reference. Give the strip the same drop shadow as the frame but lower the opacity to 80.

Copy element 59 and paste as a new layer. Resize 50% and sharpen. Rotate 15 degrees to the left and arrange on the top left of the frame under the tube like you did the strip.

Copy element57 and paste as a new layer. Resize 40% and arrange it on the right side of the frame.

Copy element56 and paste as a new layer. Resize 40% and rotate 45 degrees to the left. Arrange on the left side of the frame under the main tube.

Copy wordart 2, paste as a new layer, resize 60%, arrange at the bottom of the frame.

Give all of your elements and the wordart the same drop shadow you gave the strip.

Now activate your raster 1 layer which should be the one you floodfilled with white at the beginning.

Copy a paper of choice, I used paper 14. Create a new mask layer from image. Select your mask in the drop down menu and click ok. Merge group. Then copy a second paper, I used paper 8, paste as a new layer and add the mask again like we did before, merging group as you did the first one. Then lower the opacity on this layer by 70%. Merge the gold mask layer down onto the first one. Now resize this layer 105%, all layers unchecked.

With your mask layer still active, crop your tag to remove any excess space. Make sure you don't cut off any tubes or drop shadows. Use the nodes at the top/bottom or sides to drag out if needed.

Now I don't like large tags so I resized mine down 75%, all layers checked. Make sure you resize before adding copyright info.

Activate the top layer in your layer palette, should be the wordart. Add your copyright, license info and taggers mark. Don't forget to add credit for the scrap kit if required by the designer.

Add your name using colors from your tag. If you want to use the same colors as me I used #9e7004 for the foreground and #f1ae02 for the background. Then give it an inner bevel. This is one I've used before when I use gold colors.


Give it a gradient glow, the color is #d7c570:


Then a light drop shadow of -1, 1, 50, 5.

You can now delete the white background layer, merge visible and save as a png or merge flat and save as a jpg. Congrats, you're done!


Sunday, July 14, 2013

New Old School Tut - Summer Sexy

This tutorial was written by me on 07/14/2013 and assumes you have working knowledge of PSP. Any simularities to other tuts is purely coincidental and not done on purpose.

For this tut you will need:
PSP - I use version X3 but most versions will do
Animation Shop
Template 82 by Blissfully Beth (download pack 81 - 90 on the left side of the page)
Tubes of choice: I used 3 by PinupToons, 32-1, 36-3, 119-2. You can purchase these tubes at CDO. Do NOT use without purchasing a license first.
Reflet Program here
This is a stand alone program, just save it to My Documents or anywhere you can easily find it.
Doodle frame and water tube here
The frame was made by me using brushes and preset shapes
Xenofex 2
Eye Candy 4000
Font of choice: I used Piranesi It BT

Open all tubes and template in psp, duplicate and close the originals. Remember to save as you go as this tut has a lot of steps.

First, we're going to change our template from 200 ppi to 72 ppi. So shift S to bring up the resize menu and change the Resolution to 72 pixels per inch and the Pixel Dimentions to 100 percent. Make sure all layers is checked. Now resize the template again to 80%, all layers checked and delete the copyright layer, the black circle layer and the 2 dark grey bars at the bottom of the template. Activate the grey circle layer.

Copy your water tube and paste as a new layer on your template. Using your raster deform tool, pull on the top and bottom nodes until the water fills up the entire blue circle frame.


Now copy this layer and paste as a new image. We're going to temporarily save it as a psd file on our desktop. I named mine water.psd.

Open up your Reflet program. Click on the folder icon and find your water image that you just saved on your desktop. Make sure you have images at 5, height at 90% and perspective ticked. Click on the 3rd icon, looks like a floppy disk. Make sure export format is gif. Tick Reflection Only. Color count should be 256. Click ok and name it water.gif. Again, save it on your desktop. When it asks if you want to create a HTML page for test, click no. You can now close Reflet.

Open up Animation Shop, find your water.gif file on your desktop and open it up. Select all and copy. Go back to psp and paste as a new image. Starting from the bottom rename them water 1, water 2, etc.

On your template you can now delete the water layer. Make sure the grey circle is active and go back to your water frames that you pasted over from AS.

Starting from the bottom copy the water 1 layer and paste as a new layer on your template. Go back and copy water 2 and paste it as a new layer on your template again. Repeat for all 5 water layers. Rename the layers in your palette on your template to reflect the same you did for the copied layers from AS. It should look like this:


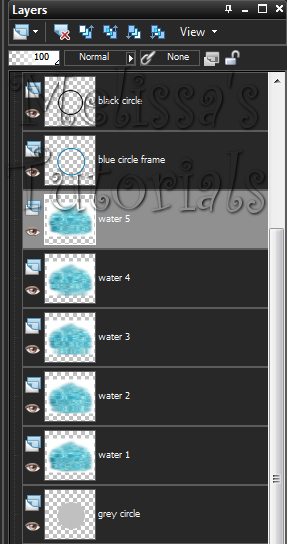
Activate the blue frame, click inside with your magic wand. Expand by 5. Invert selection, activate the water 5 layer and hit delete on your keyboard. Then activate the water 4 layer and hit delete. Repeat with the other 3 water layers. Deselect. Hide all the water layers but the first one. Give your blue circle a drop shadow of 0, 0, 50, 5.

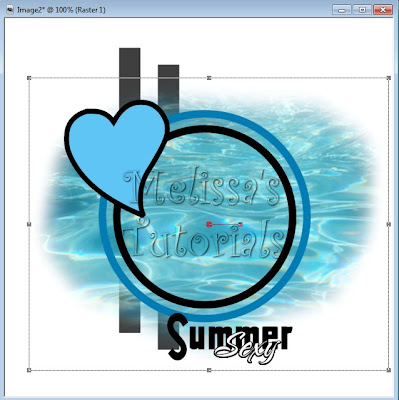
Make sure your blue circle layer is active and copy your Luci tube and paste as a new layer. Resize 85%, all layers unchecked. Arrange her so her finger tips are hanging over the bottom of the frame. See my tag for reference. Give her a drop shadow of -3, 0, 60, 10.

Activate the heart layer and mirror. Use your mover tool to place it where you like it. Repeat the mirror with the heart frame layer, line it up with the heart layer.

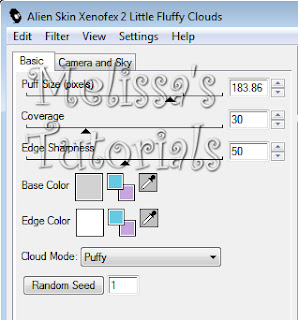
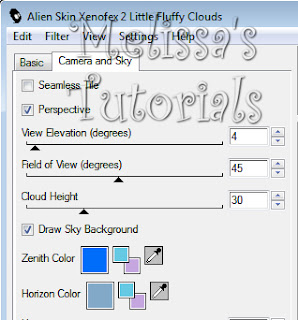
Activate the heart layer again. Click on with your magic wand. Apply Xenofex 2, Little Fluffy Clouds with these settings:


While you still have the heart selected, this is good time to line up that heart frame again in case you didn't get it quite even before. Deselect when done.

Make sure your heart frame layer is active. Click on it with your magic wand, add a new raster layer and flood fill with the same color as the blue circle. Deselect. Activate the heart frame layer again and press delete on your keyboard. Now click the flood filled layer and merge down. Give it a drop shadow of 0, 0, 50, 5.

Now select your second PUT tube, copy and paste as a new layer. Move her over the heart, resize if needed. I resized mine 80%. Move this layer under the heart frame if she's not already. Give her a drop shadow of -1, 0, 50, 5. Activate the heart frame. Click inside with your magic wand. Expand by 4. Invert Selection, activate the tube and hit delete. Deselect.

Copy your 3rd PUT tube, paste a new layer on your template, resize same as the other tube. Arrange where desired and give same drop shadow as before.

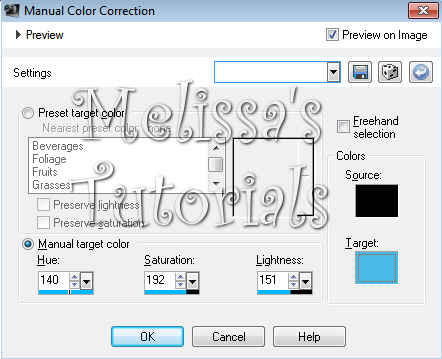
Now I moved the wordart over to the left so it lines up with the main tube fingers. See my tag for reference. Use your Manual Color Correction tool to change the color of the wordart. I changed mine to #49bae5.


Give it the following inner bevel:


Then give it a slight gradient glow using these settings. The basic tab at 3, 25, 100, the box checked. Then the color tab like this, the blue is #2f7b97:
 

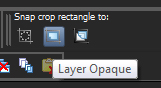
Copy your doodleframe and paste as a new layer. Arrange it so it's centered with the blue circle and move down in your layer palette so it's under the grey circle. Give it a drop shadow of 0, 0, 50, 5. Now with this layer still active, click on your crop tool. Where it says Snap crop rectangle to: click the middle icon for layer opaque.


If you need to, drag the top and bottom nodes so you don't crop off the main tube's head/drop shadow or the wordart. Double click or click the green check mark when you're satisfied.

Now activate the top layer in your palette. My tag is too big for my tastes and so I'm going to resize it again by 85%, all layers checked.

Now add your copyright, license info and taggers mark.

Click on your text tool, add your name using your chosen font and foreground/background colors from your tag. I used #057cb3 and #66c9e4. Rotate 45 degrees to the left. Arrange where you like it and convert to raster. Give it the following inner bevel and gradient glow and then a drop shadow of -2, 2. 50, 5:


Activate on the blue circle layer. Copy merged and paste as a new animation in AS. Go back to psp, unhide water 2, copy merged and paste AFTER current frame in AS. Repeat with each of the other water layers until you have all 5 frames in AS.

Save your tag and congrats, you're done!