Showing posts with label Old School. Show all posts

Thursday, April 12, 2018

Mr. Bond - Old School

This tutorial was written by me on 04/11/2018 and assumes you have working knowledge of PSP. Any similarities to other tuts is purely coincidental and not done on purpose.


For this tut you will need:

PSP - I use version X9 but most versions will do
Tube of choice with matching image, I'm using the art of Dave Nestler, available at CDO
Do not use this tube without purchasing a license first
Mask of choice, I'm using WSL_Mask84, you can find all of her masks available for bulk download on her blog here
Fonts of choice, I'm using 2 Peas Blueberry Pie, 2 Peas Fancy Free, Panda Tired Script
Filters used:
Xero Porcelain
Penta.com Dot and Cross
Mura Meister Copies
Eye Candy 4000 Gradient Glow

Let's begin, don't forget to save often.

Open your tube and matching image in psp. Duplicate both and close originals. On the image, promote background to layer, increase canvas size to 600 x 600, center placement. Rename this layer bg. Add a new raster layer and flood fill white. Send the white layer to the bottom.

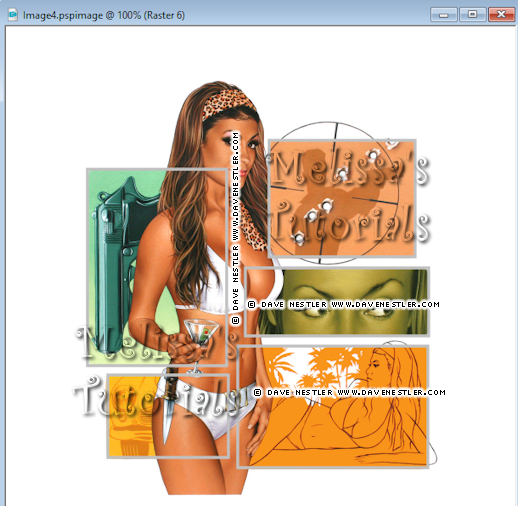
Activate your bg layer. Click on your rectangle shape tool. Line style solid, width 4, foreground to a color of choice, I used #c0c0c0, background null. You're going to draw a rectangle around each section on your image. So starting with the section with the bullet holes, it'll look like this:


Use the vecter nodes to adjust your rectangle if needed. Convert to raster when you finish. Repeat with the other sections. I drew most of my rectangles from top left to bottom right. If the main image (tube) is covering part of a section, then draw from bottom right to top left and just imagine where it might end, don't worry if you go over the tube part as it'll get covered.


When you get all of your sections done, it should look like this:


Now hide the white layer and the bg layer. Merge visible on all of your rectangles. Rename this layer boxes. Unhide your other two layers.

Using your magic wand, set to Add, RBG Value, tolerance and feather both at zero. Click inside each box. Expand by 2. Invert selection. Activate the bg layer and press delete. Deselect. You should now have something like this:


Duplicate your bg layer two times for a total of 3 layers. Move one of the copies down just above the white layer, rename mask and hide for now. Working on the original bg layer, apply Xero Porcelain with default settings but move the blue slider to 0. On the copy of bg, give it a gaussian blur of 2. Change the blend mode to overlay. Activate the boxes layer. Add noise at Uniform, 40%, monochrome checked. Then give it a drop shadow. I used 0, 0, 50, 5, all layers unchecked.

Copy your tube and paste as a new layer. Line her up with the image on the bg, I used the elbow for placement. Rename this layer tube. Duplicate your tube. On the original, apply Porcelain with the same settings. Activate the copy of your tube. Give it the same gaussian blur, but change the blend mode on this one to soft light. Activate the original tube layer. Give it a drop shadow, I used 0, 3, 60, 10. Repeat the drop shadow at 1, -1, 40, 2.

Make sure the top layer in your palette is active. Click on your ellipse shape tool. Same settings as before but change your foreground color to one of choice, I used #a0f5bf. Hold down the shift key and draw out a circle a little bigger than the area with your boxes. See my tag for reference. Use the vector nodes to adjust if needed. When happy with your circle convert to raster. Apply noise with the same settings as before. Rename this layer circle border. Keep it at the top of your layer palette for now. 

Click inside the circle with your magic wand. Expand by 2. Add a new raster level. Flood fill with the same color you used for the circle. Deselect. Rename this layer circle bg. Apply Penta.com Dot and Cross with default settings. Move this below the original bg layer. Activate the circle border layer, give it the same drop shadow you did the boxes.

With the circle border layer still active, zoom in about 400%, draw a selection around the part of the circle that goes over the tube.


Promote selection to layer. Activate the circle border layer and press delete. Deselect. Activate the blurred tube layer. Using your freehand selection tool and still zoomed in, carefully draw along the circle and around the part of the tube that sticks out below the circle.

Press delete, activate the original tube layer, delete once more and deselect.

Move the circle border layer down to above the circle bg layer. Activate and unhide the mask layer. Apply Mura Meister Copies, Wallpaper Rotate. Give it a gaussian blur of 10. Add mask from image, and merge group. Resize the mask about 105%, all layers unchecked. I used the raster deform tool to stretch it out and move it down a bit so you see more of it to the sides and below the circle. See my tag for reference.

Activate the top layer in your palette. Click on your text tool, I used the 2 Peas Blueberry Pie font. Create as vector, foreground null, background white. Type out Mr. Bond. Convert to raster. Give it a drop shadow of 0, 3, 50, 5. See my tag for placement. Rename this layer Mr Bond.

The rest of the text we're going to add one word at a time. See my tag for placement of each word. Change your font to something different. I used 2 Peas Fancy Free. You can use the same color or change to a color that matches your tag. Let's do the word 'I've'. Convert to raster when you're happy with it and give it the same drop shadow. Don't forget to rename each layer with the word you added. For the word 'expecting' you might have to change the size of the font to get it to fit properly. All of my words with this font were size 48, except 'expecting' I did at 45. 

Delete the white background layer, crop merged opaque. If you want to resize your tag, now is the time. I resized mine 85%, all layers checked. Make sure the top layer in your palette is active. Add your copyright info, license and tagger's mark.

Change your font to one for your name. I used Panda Tired Script, color to match your tube/tag, I used #a88e13. Add your name, convert to raster and give it a slight inner bevel:


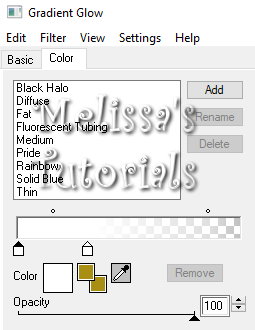
Then apply a gradient glow using these settings and the glow width at 3.


Finally drop shadow your name using the same shadow as before but change the horizontal to 2.

Merge visible and save as a png or merge all and save as a jpg. Congrats, you're done!

I made a matching Incredimail Stat to go with the tag, you can download it by clicking on the preview below.


Wednesday, July 27, 2016

Monday, May 2, 2016

Earl Grey - Old school style forum tag

This tutorial was written by me on 04/30/2016 and assumes you have working knowledge of PSP. Any similarities to other tuts is purely coincidental and not done on purpose.


For this tut you will need:
PSP - I use version X3 but most versions will do
Tube of choice, I'm using the art of Ash Evans, available at CDO
Do not use this tube without purchasing a license first
Font of choice, I'm using Ababil Script Demo
Filters used:
Mura Meister Copies
DBS Flux Gears & Linear Transmission
Xero Porcelain
Eye Candy 4000 Gradient Glow
 
Let's begin, don't forget to save often.

Open a new image 600 x 250. Flood fill with a light color from your tube. I chose a pale pink, #e7c4d9. Copy your tube and paste as a new layer. I chose with mine to move it up so mostly only the tea cup part of the tube is showing, but this is optional. If you do the same/similar then activate the colored layer. Select all and crop to selection.

Activate your tube layer again. Apply Mura Meister Copies, Wallpaper Rotate with default settings. Give it a gaussian blur of 6.

Duplicate the blur layer and on the original apply DBS Flux Gears with the settings at 8 and 18. Change the blend mode of this layer to Multiply and 50% opacity.

On the duplicate apply DBS Flux Linear Transmission with the settings at 5, 10, 50 and Horizontal ticked. Change the blend mode of this layer to Hard Light.

Copy and paste a close-up of your tube. Arrange on one side of the tag. Change the blend mode to Hard Light and the opacity to 75%.

Copy and paste your tube as a new layer, resize as needed. I resized mine 50%. Arrange on the opposite side of the close-up. Apply Xero Porcelain at default settings but change the strength to 98 and the blue slider at 0. Give your tube a drop shadow at 0, 0, 80, 10.

Add a new raster layer. Select all. Flood fill with black. Contract by 1, add a new raster layer and flood fill with a darker shade of your base layer. Contract by 3, add a new raster layer and flood fill with black again. Contract by 1 and press delete. Activate the middle color layer, press delete. Finally activate the bottom black layer and press delete. You may now deselect.

 Activate the middle color layer and apply an inner bevel:


Hide the 3 border layers. Layers, View, Invert. Merge the 3 border layers together. Change the view back to all and give your border the same drop shadow you used on the tube.

Add your artist copyright, license and tagger's mark.

Add your name using colors from your tube. Give it the same inner bevel we used for the border. Then give it a slight gradient glow with the glow width at 3:


Then give your name a drop shadow, I used -2, 2, 50, 5.

Merge visible and save as a png or merge all and save as a jpg. Congrats, you're done!

Saturday, April 4, 2015

Cookie Twirl - Old School Forum Tag

This tutorial was written by me on 04/04/2015 and assumes you have working knowledge of PSP. Any similarities to other tuts is purely coincidental and not done on purpose.


For this tut you will need:
PSP - I use version X3 but most versions will do
Tube of choice - I'm using the artwork of Anna Marine
 You can purchase this tube at CDO. Do not use this tube without purchasing a license first.
Macaroon color palette or other color palette of choice
Font of choice, I used SandyTextHmk
Filters used:
Mura Meister Copies
Xero Porcelain
AAA Frames Foto Frame

Let's begin, don't forget to save often!

Open your color palette and tube in psp. Duplicate both and close the originals.

Open a new workspace 600 x 250. Flood Fill white.

Ok working on your color palette, click on one of the corners and drag out just a bit so you can see the grey around it. Using your selection tool, draw a selection on just the picture portion of the palette:


Copy and paste as a new layer onto your workspace. You can now deselect on the palette and minimize it for now. On your workspace with the pasted image, apply Mura Meister Copies on Wallpaper (rotate) at default settings. Apply the filter 1 to 3 times more until you have a fairly even assortment of all of the colors on the tag. This is what mine looks like (as I'm recreating the tag as I write this tut) and because the filter does it randomly, no 2 tags will be exactly the same as this is different from my original:


Now apply to this layer a Radial Blur with your settings on Twirl, Strength is 40, Twirl degrees is 20, Elliptical checked and all other options at 0. You should now have something like this:


Copy your tube, paste as a new layer, resize as needed. I resized mine 90%, all layers unchecked. Arrange your tube on 1 side. Duplicate and mirror. Move the duplicate below the original tube in your layer palette. Change the blend mode to soft light and the opacity to 80%. Arrange her a little different then the original, I moved mine up a bit.

Activate your original tube, apply Xero Porcelain at default settings but move the blue slider to 0. Give her a drop shadow of 0, 0, 80, 10.

Activate your white background layer. Select all. Go to Image, Crop to Selection.

Now activate your blurred layer. Apply AAA Frames Foto Frame with the width at 10 and the opacity at 40. Leave all other settings at 0. Activate the duplicate tube layer and apply the filter again. Finally activate the original tube layer which should be top in your palette and apply the filter a 3rd time.

Now with your top layer still active, add a new raster layer. Select all, flood fill black. Contract selection by 1 and press delete. Deselect.

Add your copyright, license info and tagger's mark.

Add your name using chosen font and colors from your tag or color palette. I used #fe5f4c for the foreground and #ffe3be for the background. Give it an inner bevel, I used this one:


Then give your name a drop shadow, I used 0, 2, 50, 5.

Merge visible and save as a png or merge all and save as a jpg. Congrats, you're done!


Tuesday, March 24, 2015

Bad Girls - FTU Animated

This tutorial was written by me on 03/24/2015 and assumes you have working knowledge of PSP. Any similarities to other tuts is purely coincidental and not done on purpose.


For this tut you will need:
PSP - I use version X3 but most versions will do
Animation Shop
Tube w/closeup of choice - I'm using the artwork of PinupToons
This tube was the October 2014 bonus tube from CDO
Template by me here
Mask 53 from Moonbeams & Spiderwebs
Filters used:
Eye Candy 5 Textures & Impact
Xero Porcelain
Eye Candy 4000 Glass & Gradient Glow
Font of choice, I used La Portenia de la Boca

Special thanks goes to:
Kiya Sama
for her permission to write this tut as it resembles one of her own

Let's begin, remember to save often.
Open template and your tube, duplicate and close originals. Delete the credit layer on the template.

Please note: Do not use your magic wand to select any of the circle layers since it'll leave them with jagged edges.

We're going to start with layer 1 and work our way inwards. You can change the color of this as we do in future steps but for now let's just leave it black. Apply Eye Candy 5, Textures, Swirl with these settings:


Now activate layer 2. Select all, float, defloat. Add a new raster layer. Flood fill with a medium light color from your tube. I used #c62f2f. Deselect. Delete the original layer. Rename the new flood filled layer Outer Light.

Activate layer 4 and repeat with the same color. Rename this layer Inner Light when you're done.

Activate layer 3. We're going to select it in the same fashion but this time you'll flood fill with a darker color from your tube. I used #700708. Do the same with the layer 5 layer. Rename these Outer Dark and Inner Dark.

So now your layer palette from the bottom up should be raster 1, layer 1, outer light, outer dark, inner light, inner dark.

Activate the outer light layer again. Apply Texture Effects, Weave with these settings:


Apply the same weave effect to the inner light layer and layer 6.

Now activate layer 7. Select as before, new layer and flood fill with a slightly lighter color than your light circles. I used #cb2f2f. Delete the original layer and rename the new layer Center.

Copy your tube closeup and paste as a new layer. Arrange her over the center circle. Resize if needed. Apply Xero, Porcelain at default settings but move the blue slider to 0. Give her a very slight drop shadow at 1, -1, 30, 5.

Activate the center layer again. Select all, float, defloat, invert selection. Activate the closeup tube layer and press delete. Deselect. Change the blend mode to hard light.

Activate the center layer once more. Select all, float, defloat as before. This time expand the selection by 1. Add a new raster layer and move it above the closeup tube layer, flood fill with black. Keep selected. Contract selection by 3. Press delete and now you can deselect. This covers up the edge of the center circle.

Now we're going to add the following drop shadow to only some of the layers. Layer 1, outer light, inner light and layer 6. Apply 0, 0, 100, 15.
Activate outer dark layer. Now you're going to give this one the same drop shadow but this time make sure you check the box to put the shadow on a new layer. Do the same for the inner dark layer.

Activate the outer dark layer again. Duplicate this layer 2 times for a total of 3 layers. Name them from the bottom up: outer dark 1, outer dark 2, and outer dark 3.

Apply the same Swirl as you did for layer 1. Activate outer dark 2, apply the swirl but click on the random seed 1 time. Hide this layer. Activate outer dark 3, apply the swirl, once again clicking on random seed. Hide this layer also.

Now activate the Inner Dark layer. Repeat the same as you did for the outer dark layer, making 3 layers and renaming them. Then apply the filter to each as before.

So now there should be 3 outer dark layers and 3 inner dark layers with the filter applied and a shadow on a separate layer for them both.

Now go up and activate the wordart layer. Select all, float, defloat. Add a new raster layer and flood fill with a dark color from your tube. I used the same dark red as I did the dark circles. Deselect.

Apply Eye Candy 5 Impact Glass. My wordart is red so I clicked on Ruby on the settings tab. The basic tab looks like this: (The glass color is the same color used for the light circles)


Activate the white bottom layer for the wordart and give it a drop shadow, I used -2, 2, 60, 10. Be sure to uncheck the shadow on a new layer box.

Now go down and activate the white raster 1 layer. Add a new layer and flood fill with a color from your tube. I used the same dark red. Add your mask from image, merge group. It's a tad small so resize it up about 107%, make sure all layers is unchecked. While still on the mask layer, crop layer opaque.

Now go back up and activate the top layer in your palette. Copy your full tube and paste as a new layer. Resize as needed, I resized 83%. Arrange her how you like and duplicate this layer. Hide the duplicate and activate the original. Apply the same Porcelain filter as you did the closeup.

Activate and unhide the duplicate, give it a gaussian blur of 2. Change the blend mode to soft light and lower the opacity to about 60%.

Activate the original tube layer. Give it a drop shadow of -3, 3, 60, 10. Repeat with a drop shadow at 1, -1, 50, 5.

Ok if you're going to resize your tag, now is the time to do it. However, resizing in psp causes some of the circle layers to have a ugly edge to them, so we're going to resize in Animation Shop. Make sure your 2nd and 3rd dark circles for both outer and inner are hidden. Copy merged and paste as a new animation in AS.

Back to psp, hide outer and inner dark 1 and unhide the dark 2 layers for both. Copy merged, back to AS and paste AFTER current frame.

Back to psp and this time we're going to hide the dark 2 layers and unhide the dark 3 layers. Copy merged and paste after current frame in AS.

Now in Animation Shop, resize 85%. Click on frame 1, select all, copy and paste as a new image in psp.

All 3 layers will same Frame 1 but don't worry about that, it won't matter. Make sure the top layer is active. Add your copyright, license info and taggers mark. Merge all of your credits onto a single layer. Now duplicate twice. And move them so there's a credit layer on top of each frame layer. Your palette will look like this:


Now merge down each of the credit layers onto the frame layers. So when you're done you'll still have just the 3 frame layers again.

Now with the top layer active again, add your name using chosen font and colors from your tube. I used the same colors as I did for the template.

Convert to raster and give it a glass bevel with Eye Candy 4000 Glass and these settings:
Then give it a slight gradient glow with the glow width at 3:
Then give your name a drop shadow, I used -2, 2, 50, 5.

Now you're going to do just like you did with the credits. Duplicate twice for 3 layers, moving each one so they're on top of each frame:


Merge down each one so you have the just the 3 frame layers again. (Though I have a script that does this for me.) Now you can transfer this to AS two ways. You can copy each layer over as did before. Or you can just save your tag as a psp or psd file. Then open that file in AS.

Either way, once you have it back in AS. Make sure the 1st frame is active. Select all. Alt Enter to bring up the frame properties box. Change the speed to 15. Now save your tag and congrats, you're done.

*Tip, save the 3 frame tag minus your name, what I call an animated blank. Make sure you include in the file name the speed you have to change it to before you fully animate it. This makes it much easier when you have to make tags for others if most of the work is done for you. Also, you can save the full tag before you intially moved it over to AS as a blank also. Remember to save with layers intact (not merged) so if you make a goof it's much easier to go back and fix it.


Tuesday, January 13, 2015

Valentine - Old School, No Scraps

This tutorial was written by me on 01/13/2015 and assumes you have working knowledge of PSP. Any similarities to other tuts is purely coincidental and not done on purpose.


For this tut you will need:
PSP - I use version X3 but most versions will do
Tube of choice - I'm using the artwork of Jasmine Becket-Griffith
You can purchase this tube at CDO. Do not use this tube without purchasing a license first.
Ding font ess_bgalore
(I have searched all over the internet, can NOT find this font anywhere by this name or any other, if you or someone you know owns it, please let me know asap and I'll credit them and/or remove it.)
Mura Meister Copies
Xero Fritillary, Porcelain, Radiance
Mask84 by WSL
Font of choice, I used Volante

Let's begin, remember to save often.

Open a new workspace 600 x 600. Flood fill white. Click on your text tool and find your ding font. Select a nice medium dark color from your tube for your foreground, I used #870018, stroke 1. Background a slightly lighter color, I used #c6436f. Click inside your canvas, type a lower case e or other letter of choice. Highlight the shape in the text entry box, change the size to 300. This is what I used for my tag, you might want differently depending on your shape and tube.

Move the shape to about the center of your canvas and convert to raster. Rename this layer Shape. Give it an inner bevel of choice, I used this one:

Copy your tube and paste as a new layer. Duplicate your tube, hide the original for now and move the duplicate under your shape layer. Apply Mura Meister Copies, wallpaper rotate at default settings. Resize this layer 80%, all layers unchecked. Give it a gaussian blur of 10. If desired, move it so the part you like best is whithin the center of the shape. I ended up rotating mine 90 degrees to the right.

Activate your shape layer again. Click inside the very center with your magic wand. Expand by 3. Invert selection, activate the blurred layer and press delete. Deselect. Rename this layer Blur.

With your blurred layer still active, add a new raster layer. Activate your shape layer again. This time you're going to click within open space outside the center:


Activate blank layer you made under your shape, flood fill with a light color from your tube. I used #e26293. Rename this layer Shape Fill. Apply Xero, Fritillary at default settings but change the Variation to 25.

Give your shape layer a drop shadow of 0, 0, 100, 3.

Activate and unhide your original tube layer, should be top layer in your palette. I arranged mine so it looks like she's sitting on the bottom inner edge of my shape.

Duplicate your tube. On the original apply Xero Porcelain at default settings but move the blue slider to 0. On the duplicate, apply Xero Radience at the settings below, change the blend mode to soft light or one that looks good with your tube and lower the opacity to 50%.


Activate the original tube layer again. Give her a drop shadow of -3, 3, 60, 10. Repeat the drop shadow at 1, -1, 50, 5.

Hide the white background layer. Copy merged and paste back into your canvas as a new layer. Move this merged layer to just above the white layer. Give it a gaussian blur of 5. Then give it a radial blur at Spin, Strength at 10, Elliptical checked and all other options at 0.

Add mask from image, merge group. If necessary, use the raster deform tool to make sure the mask is slightly larger then your tube and/or shape, this will ensure you don't crop off any part of your tube, shape or drop shadows. Crop layer opaque.

If you wish to resize your tag, do it now. I resized 85%, all layers checked.

Activate the top layer in your palette. Add your copyright info, license and tagger's mark.

Add your name, I used the same colors I did for the shape. Give it an inner bevel of choice, again I used the same as for the shape. Apply a thin white gradient glow. Finally give your name a drop shadow, I used -2, 2, 50, 5.

Delete the white background layer, merge visible and save as a png. Or merge all and save as a jpg. Congrats, you're done!

Friday, December 19, 2014

New Exclusive Forum Tag Tut - Lilac and Lemons


Hello everyone, I have a new Exclusive tutorial over on Creative Addictions. This is an old school/no scraps forum tag tut. I hope you enjoy it. Remember, I love to see what others make from my tuts so please feel free to share. You can post a link in the comments, on my cbox or even email it to me. Thanks a bunch and happy tagging!


Saturday, November 8, 2014

Dragon Whisper - Animated Forum Tag

This tutorial was written by me on 11/08/2014 and assumes you have working knowledge of PSP. Any similarities to other tuts is purely coincidental and not done on purpose.


For this tut you will need:

PSP - I use version X3 but most versions will do
Tube of choice - I'm using the artwork of JM Leotti.
You can purchase this tube at CDO. Do not use this tube without purchasing a license first.
 Forum template 69 by Spawn
Animation Shop
Font of choice, I used Gaheris Demo
Filters used:
Mura Meister Copies
DBS Flux Bright Noise
Greg's Factory Output II Pool Shadow
Xero Porcelain
Eye Candy 4000 Gradient Glow

Let's begin, don't forget to save often.

Open forum template, duplicate and close original. Delete credits layer.

Copy your tube and paste as a new layer. Resize if needed, I resized mine 75%. Arrange where you like it. Mine is cut off on one side so I moved her over to the right so the cut portion doesn't show. Move your tube layer under your border layer.

Activate the main background layer. Copy and paste your tube again. Apply Mura Meister Copies, Wallpaper Rotate at default settings. Now I wanted more green showing on mine in the area opposite the main tube so I clicked undo and reapplied again till I got something I liked. So this is optional for you, depending on your tube.

Apply a Radial blur with these settings, and rename this layer Blur when done:


Activate the black lines layer. Add a new raster layer and flood fill with a medium color from your tube. I chose #353f2d.

Activate the black lines layer again. Select all, float, defloat and invert. Activate the flood filled layer and press delete. Deselect. You can now delete the original black lines layer. Or what I do is just delete what's on that layer and merge the flood filled layer down onto the now blank layer so it's still labeled properly.

Ok we're going to rearrange some layers here to make things a bit simpler. Click on the Top Light Twirl layer and bring it down in the layer palette so it's above the Bottom Light Twirl layer. Merge down and rename Light Twirl.

Now click on the Top Dark Twirl layer, bring it down in your layer palette so it's on top of the Bottom Dark Twirl layer. Again, merge down and rename Dark Twirl.

Finally repeat this same thing with the twirl dots layers.

Now activate your Dark Twirl layer. Select all, float, defloat. Add a new raster layer and flood fill with a color from your tube. I chose #687b53. Deselect. You can now delete the original dark twirl layer.

Repeat this same step on the light twirl layer using a lighter (or darker if you want) color from your tube. I used #949c63. Don't forget to delete the original layer when you're done. Apply DBS Flux Bright Noise at 30%, Mix selected.

You can change the color of the twirl dots but I opted to keep them black.

Now we're going to add some drop shadows. Activate your black lines layer again. Give it a slight drop shadow of 0, 0, 50. 5. Your Light Twirl layer is going to be a bit darker at 0, 0, 60, 10. And then finally a light drop shadow again on the dark twirl layer. I used, 0,0, 30, 5.

Now we're going to go down and activate our Blur layer. Duplicate this layer twice for a total of 3 layers. Rename them from the bottom as Blur 1, Blur 2 and Blur 3.

Activate the blur 1 layer and apply Greg's Factory Output II, Pool Shadow with default settings EXCEPT change the Center to 90, Intensity to 100 and the Lightness to 120.

Activate blur 2 and repeat the filter but change the Center to 130. Repeat with the blur 3 layer and the Center at 180. Hide the blur 2 and 3 layers for now.

Now activate your main tube layer. Apply Xero, Porcelain at default but change the blue slider to 0. Give your tube an overall drop shadow at 0, 0, 80, 15.

Activate your border layer. Select all. Add a new raster layer and flood will with black. Keep selected. Contract selection by 1. Fill with your dark color you used for the black lines. Contract by 2. Fill with black again. Contract by 1 and press delete. Deselect.

Activate the original border layer again. Select all, flood fill black. Contract by 4, press delete and deselect. Give this layer a gaussian blur at 3.

Add your copyright, license info and tagger's mark.

Add your name using colors from your tube. Give it an inner bevel, I used this one:


Then I gave it a gradient glow using these settings, with the glow width at 3:


And then finally a drop shadow, I used -2, 2, 50, 5.

Now to animate. If you choose to skip this step you can just merge all now and save as a jpg. Otherwise, continue.

Make sure that your blur 2 and blur 3 layers are still hidden. Copy merged and paste as a new animation in AS.

Go back to PSP, unhide blur 2, copy merged and this time in AS paste AFTER current frame. Easy way to do this is to press Ctrl Shift L.

Back to PSP again, unhide blur 3, copy merged and in AS, paste after current frame.

So you should now have 3 frames. Click on frame 1. Select all. Press alt enter to bring up the frame properties box. Change the speed to 20.

Save your tag and congrats, you're done!

Thursday, November 6, 2014

Red Poppy - Old School

This tutorial was written by me on 11/06/2014 and assumes you have working knowledge of PSP. Any similarities to other tuts is purely coincidental and not done on purpose.


I had a complete hard drive crash back in September. It was absolutely devastating as I lost everything. I'm in the process of getting back what I can but some things I'll never get back. This tag is one of the first tags I made after my crash. I had no filters at all and a small handful of tubes. I liked how this tag turned out so well that I decided to write a tut for it as soon as I was able. I have filters now but only made a small change on this one to use a gradient glow on the name. Everything else is 100% old school.

For this tut you will need:

PSP - I use version X3 but most versions will do
Tube of choice - I'm using the artwork of Jasmine Becket-Griffith.
You can purchase this tube at CDO. Do not use this tube without purchasing a license first.
 Mask 12 by WSL
Ding font Starz 2 
Font of choice, I used Whackadoo
Eye Candy 4000 Gradient glow
Let's begin, remember to save as you go.

Open a new image 550 x 550. Flood fill white. Copy your tube and paste as a new layer. Resize if needed.

Duplicate your tube and flip. Change the blend mode on the top tube to overlay. Merge Down.

Duplicate your merged layer and rotate 90 degrees to the left. Change the blend mode on this layer to hard light. Merge down again and you should have just 2 layers. The white flood filled and the layer with your merged tubes.

With your merged layer active, add mask from image and merge group.

Activate your text tool. Select your ding font. Change your foreground and background to a medium and dark color from your tube. So I used 2 shades of red from the poppies. Click on your foreground box and create a foreground-background gradient with the angle at 45, repeats 1. Invert will depend on your colors and if you want the darker color on the outside or inside. Click ok when done. And now set the background color to null.

Click on your canvas and type a capital I. Highlight the letter in the text entry box, change the size to something about as big as your mask layer. So for mine, the size is 550. So when your satisfied with how it looks, convert to raster and move it so it's centered on your mask. Give it a very slight drop shadow at 0, 0, 30, 5.

Copy your tube and paste as a new layer again. Resize so it's about the same size as your masked area. I resized mine 80%. Give your tube a darker drop shadow, I used -3, 3, 60, 10. Then I repeated the drop shadow at 1, -1, 50, 5.

Now you can add your copyright info how you like or if you want to do it on a curve like on my tag then follow these steps:

Change your foreground color to solid, with the background still null. Click on your Preset Shape/Ellipse Tool. Mode circle, width 3, create on vector and anti-alias checked.

Hold down your shift key and draw a circle about the size of your mask layer. Object, Align, Center in Canvas. If you need to adjust, click on the edit mode on the tools options bar. Keep this layer as a vector.

Click on your text tool again. Select your font for your credits. Add a new Vector layer, this is important. Be sure you change the text size back down to the proper size for adding credits. Change your foreground to null and your background color will be whatever color you want your credits to be in. Don't worry if this changed the circle, it won't matter when we're done. Put the alignment at center. Now hover your mouse over the top center of the circle until you see the curser change with a curved line under the A. Click and type out your credits. When you're done convert to raster and delete the vector layer with the circle.

Now activate your mask layer and click on your crop tool. Crop layer opaque.

Activate the top layer in your palette and add your name using foreground and background colors from your tube.

Give it an inner bevel of choice, I used this one:

Then give it a gradient glow, I used this one with the glow width at 3:


Finally give your name a drop shadow, I used -2, 2, 50, 5.

Delete the white layer, merge visible and save as a png or merge all and save as a jpg. Congrats you're done!

Monday, September 1, 2014

New Exclusive Forum Tag Tut - Zinnia Brights


Hello everyone, I have a new Exclusive tutorial over on Creative Addictions. This is a forum tag tut. I hope you enjoy it. Remember, I love to see what others make from my tut so please feel free to share. You can post a link in the comments or on my cbox or even email it to me. Thanks a bunch and happy tagging!

Saturday, May 31, 2014

She's A Star - Old School/No Scraps

This tutorial was written by me on 05/31/2014 and assumes you have working knowledge of PSP. Any simularities to other tuts is purely coincidental and not done on purpose.


For this tut you will need:

PSP - I use version X3 but most versions will do
Animation Shop
Tube of choice - I'm using the artwork of Michi Art. You can buy it from CDO
Do not use this tube without purchasing a license first.
Tag Template 26 & Wordart Template 17 both by Divine Intentionz
You can download the wordart templates from the link on the left side of her blog under her TOU
Font of choice, I used Refreshment Stand
Mura Meister Copies
Xero Fritillary, Porcelain & Radiance
Xenofex 2 Constellation
Eye Candy 4000 Gradient Glow

Let's begin, remember to save often.

Open tag template in psp, duplicate and close the original. Delete the credits layer.

Activate the circle layer. Copy your tube and paste as a new layer. My tube came as a half tube also, so I used that one and resized 75%, all layers unchecked. Apply Mura Meister Copies, Wallpaper Rotate at default settings.

Give this layer a radial blur with Spin, 30%, Elliptical checked and all other options at 0. Rename this layer circle blur. Duplicate this layer 2 times for a total of 3 layers.

Click on the first blur layer. Apply Xero Fritillary at 10, 30, 100 and 20. Activate the 2nd blur layer, apply the filter again but change the Variation to 22. Activate the 3rd blur layer and apply the filter once again with the Variation at 24.

Activate the circle layer. Select all, float, defloat, invert selection. Activate the first blur layer, press delete. Activate the 2nd, press delete and then finally the 3rd, press delete and deselect. Activate the bottom blur layer, give it a drop shadow of 0, 0, 100, 10, shadow on a new layer checked. You can now delete the original circle layer. Hide the top 2 blur layers for now.

Activate the small stars layer. Select all, float, defloat. Add a new raster layer and flood fill with a color from
your tube, I used #c94959, deselect. I gave my stars a slight white gradient glow. You can now delete the original small stars layer.

Activate the star layer. Select all, float, defloat. Add a new raster layer, fill with the same color you did the small stars or another color from your tube if you like. Deselect. Then give it a drop shadow of 0, 0, 70, 5. Copy your close up tube again and paste as a new layer. Arrange her so her face will fit in the star, resizing if necessary. 

Duplicate this layer. On the original apply Xero Porcelain at default settings but change the blue slider to 0. On the duplicate apply Xero Radiance at 8, 84, 117, 241. Change blend mode to soft light and lower the opacity to 60. Activate the original tube layer and give her a drop shadow of 0, 0, 50, 10. Be sure you uncheck the shadow on a new layer box. 

Activate the star layer again. Select all, float, defloat, invert selection, activate the bottom tube layer and press delete, repeat on the duplicate tube layer, deselect. You may now delete the original star layer.

Activate the white background layer. Select all and crop to selection.

Activate the dotted star outline. Apply Xenofex 2, Constellation with these settings:


Then apply a slight drop shadow of 0, 0, 50, 5.

Copy your main tube and paste as a new layer. Resize if needed, I resized mine 55%. Apply Xero porcelain but change the softness to 40. Give her a drop shadow of -3, 3, 60, 10.

Now open your wordart template, duplicate and close the original. Delete credits, big star and white background layers.

Activate the small star layer. Select all, float, defloat. Add a new raster layer and flood fill with a color from your tube. I chose a blue from her eyes, #5c8599. Deselect and delete the original small star layer.

Activate the main wordart layer, select all, float, defloat, add a new raster layer and flood fill it with a lighter
color from your tube, I used #dd7386. Deselect and delete the original wordart layer.

Copy merged and paste as a new layer onto your tag. Drag this layer under the main tube layer and move down near the bottom of the tag, see my tag for reference. Give it a small gradient glow with the glow width at 3 and the color tab like this:


Give this layer the same drop shadow you did the star layer, 0, 0, 70, 5.

Activate the dotted star outline layer again. Crop layer opaque but make sure you don't crop off any parts of your tube or drop shadows.

Activate the top layer in your palette, should be your main tube. Add your copyright, license info and tagger's mark.

Add your name using colors from your tag. I used the same pink colors I used before. Give it an inner bevel of choice, I used this one:


Then give it a gradient glow. Glow width the same as before, but color tab like this or one of choice, the pink is the same as my background color:


Then give your name a drop shadow of choice, I used -1, 1, 50. 5.

Now to animate. Your circle blur 2 and 3 layers should still be hidden. Copy merged and paste as a new animation in AS. Go back to psp, unhide the 2nd blur layer and hide the 1st. Copy merged and paste AFTER current frame. Back to psp, unhide the 3rd blur layer and hide the 2nd. Copy merged and paste after current frame.

Click on the 1st frame, select all. Bring up the frame properties box and change the speed to 15. Save your tag and congrats, you're done!

Saturday, August 31, 2013

Old School Forum Tag - Rain Rain, Go Away


This tutorial was written on 08/31/2013 and assumes you have working knowledge of PSP. Any simularities to other tuts is purely coincidental and not done on purpose.

For this tutorial you will need:
PSP - I use X3 but most versions will do
Animation Shop
Mura Meister Copies
Xenofex 2 Fluffy Little Clouds
Eye Candy 4000 Gradient Glow
Tube of choice, I used the art of Anna Liwanag.
You can purchase this tube at CDO. Do not use without purchasing a license first.
Wordart by me and rain animation here
Font of choice, I used Beatrice

Open a new image 600 x 250. Copy your tube and paste as a new layer. Apply Mura Meister Copies, Wallpaper Rotate. If your canvas isn't completely covered, undo and apply again until it's all covered.

Apply a radial blur with Zoom ticked, strength at 50 and Elliptical checked. All other options at 0. Go to Image, Flip.

Add a new raster layer, rename this layer Clouds. Apply Xenofex 2, Fluffly Little Clouds. Click on Settings and click on Factory Default and click ok. Then click on Cloud Mode and change to Fluffy.

Change the blend mode of Overlay and lower the opacity to 50%.

Open your rain image. Copy the Rain 1 layer and paste as a new layer on your tag. Repeat with rain 2 and rain 3. Rename the rain layers from the bottom rain 1, rain 2 and rain 3. Hide layer 2 and 3 for now. *Note, I mirrored all 3 layers of rain so they were going in the same direction of my tube's umbrella, but this is optional*

Now with rain 3 active, copy your tube and paste as a new layer. I moved her so she was slighly off center so she covers the point of the zoom. Give her a drop shadow of -3, 3, 70, 10. Repeat the drop shadow 1, -2, 50, 5.

Add a new raster layer. Select all and flood fill with black or a dark color from your tube. Contract by 1, add a new raster layer and flood fill with a contrasting color. I chose the red from my tube's lips. Contract by 3, add a new raster layer again and flood fill with black again. Contract by 1 and press delete on all 3 layers. You may now deselect.

Activate the middle colored layer. Give it some noise at Random, 20%, monochrome checked. Now activate the top layer and merge down twice. Rename this layer border.

Apply Eye Candy 4000, Gradient Glow. Change the Glow Width on the Basic tab to 3, Then on the Color tab click on Thin and change the color to black.

Add wordart or text of choice to the larger size of the tag. I used Beautiful ES and Beautiful Caps ES to make mine. Arrange where desired.

Add your copyright info, license and tagger's mark.

Add your name using font of choice. Since my tag is so dark I used white for both foreground and background with the stroke width at 0.5. Give it a bit of noise at the same settings as your border but change the number to 40. Give it the same gradient glow as you did the frame, but move the top slider over about to where the little dropper icon sits. Then give your name a drop shadow, I used -2, 2, 50, 5.

To Animate:

The rain 2 and rain 3 layers should still be hidden. Copy merged and paste as a new animation in AS. Back to PSP, hide rain 1 and unhide rain 2. Copy merged and paste AFTER current frame. Back to PSP, hide rain 2 and unhide rain 3. Copy merged and again past AFTER current frame.

Save your tag and Congrats, you're done!

Thursday, August 22, 2013

Old School Tut - Puzzle Fade


This tutorial was originally written by me back in 2007, this rewrite was written on 08/22/2013 and assumes you have working knowledge of PSP. Any simularities to other tuts is purely coincidental and not done on purpose.


For this tutorial you will need:

PSP - I use X3 but most versions will do
Animation Shop
Xenofex 2 - Puzzle
Eye Candy 4000 - Gradient Glow
Tube with matching image - I used the artwork of Rachel Anderson.
You can purchase this tube at CDO. Do not use without purchasing a license first.
Font of choice - I used Passion Conflict ROB

Open your tube and matching image. Duplicate both and close originals. Copy tube and paste onto your image, resize till it's the same size as the image and align it up so it fits on your image. I had to resize my tube down 78% so it fit just right.

Give your tube a drop shadow of -3, 0, 65, 10. Merge down and then duplicate. Give the duplicate layer a gaussian blur of 5.

Run your Xenofex 2, Puzzle filter with default settings. You should have something like this:


Add a new raster layer and flood fill with a color from your image. Select all, contract by 2 and press delete. Deselect. Give your border some noise at Random, 40% and monochrome checked.

Add a new raster layer again, this time flood fill with black. Select all, contract by 2, delete and deselect. Move this layer under your border with the noise. Give it a gaussian blur of 3.

Activate the top layer in your palette, should be the border with noise. Add your copyright, license and tagger's mark.

Add your name using font of choice, colors from your tube/image. Give it an inner bevel of choice. I used:


Then I gave it a slight gradient glow:


And then a drop shadow of -2, 2, 50, 5.

Copy merged and paste as a new animation into AS.

Now activate the layer that has the puzzle pieces. Run the puzzle filter again but click on the button that says 'Knockout 10% Remaining' 2 times and click on the Lighting tab and change the Groove Darkness to 10.

Copy merged and paste AFTER current frame in AS. Go back to psp, run the filter and click the Knockout button again 2 times. Again, copy merged and paste AFTER current frame.

Repeat these steps until almost all pieces are left. The filter doesn't really remove the last bits, so when you have just a little bit left, then hide that layer and copy merged and paste after current frame.

Now click on your second to last frame. I have 10 frames so I'll click on frame 9. Scroll back to the beginning. Hold down shift and click on frame 2. Now all the frames from 2 to 9 are highlighted. Copy, then go back to your last frame, click on it and paste AFTER current frame again. Then go up, click on Animation and click on Reverse Frames.

Select all, press Alt Enter to bring up the Frame Properties box. Change the speed to 15. Click on your frame with no puzzle pieces so it's the only highlighted frame. Bring up the frame properties box again and change the speed for this frame to 100. Scroll back and click on frame 1, change the speed for this frame to 50.

Save your tag and Congrats, you're done!