Showing posts with label Jamie Kidd. Show all posts

Friday, November 21, 2014

Siggy Showoff

I have several tags to show off today, made by other people, inspired by my tutorials.

This tag is made by Deb from my Sitting Pretty 2 tut.

This tag is made by Amber from my Red Poppy tut.

This tag is made by Genea from my Grid Weave tut.


The 2 tags above are from my She's A Star tut. I apologize I don't remember who made the first one. The second one is made by Genea.

Thank you ladies for the fantastic tags. If anybody else does any of my tutorials, please share with me your results and I'll post it on my blog. You can find my contact info above.

Sunday, June 29, 2014

New Exclusive Forum Tag Tut - Emma


Hello everyone, I have a new Exclusive tutorial over on Creative Addictions. This is a forum tag tut. I hope you enjoy it. Remember, I love to see what others make from my tut so please feel free to share. You can post a link in the comments or on my cbox or even email it to me. Thanks a bunch and happy tagging!


Monday, October 7, 2013

PTU - BCA Think Pink


This tutorial was written on 10/07/2013 and assumes you have working knowledge of PSP. Any simularities to other tuts is purely coincidental and not done on purpose.

For this tutorial you will need:

PSP - I use X3 but most versions will do
Eye Candy 4000 Gradient Glow
Tube of choice, I used the art of Jamie Kidd
You can purchase this tube at CDO. Do not use without purchasing a license first.
Think Pink scrap kit by Rebel Dezigns. Available for purchase at CDO.
Think Pink wordart by Rosa
Mask84 from WSL
 Font of choice, I used Saginaw

 Open a new workspace 700 x 700, flood fill white.

Open frame 2, copy and paste as a new layer. Resize 90%. Sharpen once. Copy paper 3 and paste as a new layer. Resize 60% so you can see some of the pink in the frame. Move this layer below your frame layer.

Copy your tube and paste as a new layer. Arrange it where you want it to sit in the frame, resizing if necessary. Duplicate this layer and move the duplicate above the frame. Hide for now.

Activate your frame layer. Click inside your frame with your magic wand and expand by 6. Invert selection. Activate your original tube layer below the frame, press delete. Then activate your paper layer and press delete again. Deselect.

Activate your frame layer and give it a drop shadow: 0, 0, 100, 8. Activate and unhide your top tube layer. Give it a drop shadow: -3, 3, 60, 10.

Lower the opacity on your tube to 50% and zoom in about 400% so you can easily see what your doing. Click on your eraser tool and carefully remove the parts of the tube that sits on the bottom part of the frame. Make sure you get any stray shadow and go over the frame enough so you can see the frame's drop shadow.

When you get up to the side where her hair blends in with her top, just go close to it without removing any hair, it'll get covered up with elements:


When you're all done, return the opacity of your tube to 100% again and hide and unhide the layer a few times to check for any stray pixels you missed. Zoom back out when done.

Now it's time to add our elements, see my tag for placements. Remember to drop shadow after you add each item.


Element 6.
Element 27, mirror and rotate to the left 45%.
Element 23, resize 50%, rotate 45% to the left and sharpen once. I also used the selection tool to remove the small flower on the right, but this is optional.
Element 2, resize 80%.
Element 21.
Element 30, resize 40%.
Element 14, resize 30%.
Element 17, resize 40%.
Element 10, resize 25%.
Element 18, resize 40%

Open wordart 4 from Rosa. Merge visible and paste as a new layer on your tag. Resize 60%.

Open paper of choice, I decided to use the same paper I used in the frame. Paste as a new layer, add mask from image. Merge group. Move this layer just above your white layer. Click on your Raster Deform tool and drag the nodes out on all 4 sides so you can see more of the mask. Make sure they all extend beyond any elements or drop shadows. When satisfied crop layer opaque.

Now if you want to resize your tag, now is the time to do it. My example on this page is original size but for my personal tags, I resized down 80%, all layers checked.

Add your copyright, license and tagger's mark. Don't forget to credit your scrap kit.

Add your name using colors from your tag. I used #973664 for the foreground and #eb73ac for the background. Give it an inner bevel of choice, I used:


Then give it a gradient glow. The color is #db5993.
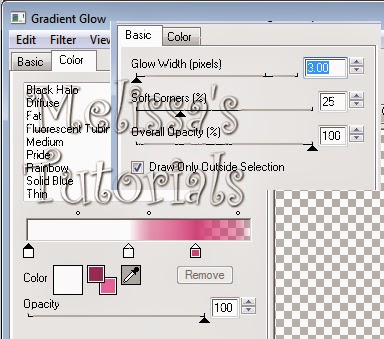


And finally a drop shadow, I used -2, 2, 50, 5.

Delete the white background layer, merge visible and save as a png or merge all and save as a jpg. Congrats, you're done!


Sunday, July 28, 2013

Lots of Avatars!

It's been awhile since I shared any new avatars with you all. You can find them all here. All the new ones are shown below.


Friday, January 11, 2013

4 New Tags

I don't know why Blogger is suddenly centering the date and blog title, nor do I know how to fix it. But anyway here's some new tags I've made in the last week.

This tag is from a tut by Abstract. You can find it here. This is actually a tut for Photoshop but it can be done in PSP with adjustments. I did about half of it in PS before I got confused and just switched over to PSP. lol

 This tag is from a tut by Just Fi. You can find it here.

This tag is from a tut by Dave's Unique PSP. You can find it here.

This tag is from a tut by Millie's PSP Madness. You can find it here.

Sunday, October 21, 2012

5 More Tags

Ok here's part 2 from my post earlier.

This first tag is from a tut by Stalked By Stayyseee. You can find it here.


This next tag is from a tut by Tagalicious Tags & Tuts. You can find it here. She does not provide a direct link to the cluster frame and it took some time to find so I saved the link and you can find it here.


This tag is from a tut by Abstract. You can find it here. This tut was written for Photoshop and so I had to make some changes. I didn't have the preset shape or the ability to change it like she did so I used VM Natural, Sparkle. 


This tag is from a tut by SuthrnPrincess Tuts. You can find it here.


This last tag is from a tut by julies jazz designz. You can find it here. I really love how this one turned out.

Tuesday, October 16, 2012

5 New Tags

Hello, I have 5 new tags to share with you today.


These first 2 are from a tut by oohbabelicious. You can find it here. I couldn't decide when I did the tut which tube I liked better so I did both.

This tag is from a tut by Guilty Pleasures. You can find it here.

This tag is from a tut by Jazzed Up Junk. You can find it here. I did this tut a few weeks ago but forgot to post it.

This tag is from a tut by Venomous Creations. You can find it here.

Monday, September 10, 2012

Lots of new tags

Hello peeps, I have a bunch of new tags to show you.

This first tag is from a tut by K'Lani. You can find it here.

 This next tag is from a tut by Whynters at Creative Addictions. You can find it here. She doesn't give the direct link to the scrap kit (huge pet peeve of mine), so I hunted it down and you can find the kit here.

 Now this next tag is from a tut by Tasha's Playground. You can find it here. This tut is written for Photoshop and I use PaintShopPro but it wasn't too hard to figure out.

Now these next 3 tags are from tuts by Candy's Treats. You can find them here, here and here.

This next tag is from a tut by Stalked By Stayyseee. You can find it here.

 These next 3 tags are from tuts by Disturbed by Gaby. You can find them here, here and here. And the animation for the 3rd tag can be found here.

This tag is from a tut by Tagalicious Tags & Tuts. You can find it here. The animation used in this tut can be found at the same link above.

This last tag is from a tut by Bright's Kreationz. You can find it here. I was a bit disappointed that there were no instructions on how to make the background yourself but the end result is still pretty.

So that's all for now, until next time, happy tagging!

Monday, August 6, 2012

Lots of Tags!

Ok I have a bunch of tags with links to share today.


These first two tags are from tuts by ooh...babelicious. You can find them here and here.


These next 4 tags are from tuts by Becky's Creations. You can find them here, here and here.


This forum set is from a tut by Vaybs. You can find it at Creative Addictions here.


This tag is actually a smaller version of my current timeline cover on Facebook. The tut is by Bethy at Dazzled By Beth-Ann. You can find it here.


This tag is from a tut by Mystery Designs. You can find it here.


This explosion of pink tag is from a tut by Angel Tuts. You can find it here.


These next 2 tags are from tuts by SuthrnPrincess Tuts. You can find them here and here.


This tag is from a tut by HorsePlay's Pasture Tutorials. You can find it here. She does not provide a direct link to the kit used, and it's hard to find so here's the link.


This tag is from a tut by Tasha's Playground. You can find it here.

Well that's all of them. Whew! Didn't realized I've done that many tags just in the last few weeks. lol