Showing posts with label FTU Scraps. Show all posts

Monday, June 18, 2018

2 New Wallpapers

So I did two tuts today by MizTeeque that I have made matching wallpapers to go with the tags.
This first tag, from this tut, uses the art of Lightartist_XXX or Alec_Rud, the page has one copyright, the tube has another, confusing! You can find this tube at PFD here.

This tag, from this tut, uses the art of PinupToons. You can purchase his art CDO. However, this was a bonus tube from August of 2015.

Both wallpapers are in 2 sizes, click HERE to preview and download.

Monday, May 28, 2018

New Wallpaper


I did this old tut by Vaybs, the tag turned out great, so I decided to make matching wallpaper. Click HERE to preview and download.


Tuesday, December 16, 2014

Christmas Cardinal - FTU Scraps

This tutorial was written by me on 12/16/2014 and assumes you have working knowledge of PSP. Any similarities to other tuts is purely coincidental and not done on purpose.
 
 For this tut you will need:
PSP - I use version X3 but most versions will do
Tube of choice - I'm using the artwork of Melissa Dawn.
You can purchase this tube at CDO. Do not use this tube without purchasing a license first.
CDO Grab Bag Freebies: Grab718 (frame), 1128 (bow) and g125 (paper, elements)
Font of choice, I used Nadine Script Extra
Filters used:
Mura Meister Copies
Mehdi Sorting Tiles
Xero Mistifier and Porcelain
Eye Candy 4000 Gradient Glow

Let's begin, remember to save as you go.

Open frame and tube in psp. Duplicate all and close the originals.

Starting with the frame, bring up the resize box. Change the resolution to 72 Pixels/Inch. Then change the pixel dimensions to 100%, be sure all layers is checked and click ok.


Change the canvas size to 600 wide, 700 high with center placement. Add a new raster layer, flood fill with white and move to the bottom of your layer palette.

Copy your tube and paste as a new layer. Move it below your frame layer if it isn't already. Apply Mura Meister Copies with Wallpaper Rotate at default settings.

Give this layer a gaussian blur at 10. Duplicate your blur layer. On the duplicate, apply Mehdi Sorting Tiles with these settings:


Change the blend mode of the tiled layer to Screen. Change the opacity of the original layer to 90%.

Activate the tiled layer again. Apply Xero Mistifier with the haziness at 246, the strength at 195 and everything else at 255.

Now activate your frame layer. Click inside with your magic wand, expand by 5. Invert selection, click on your tiled layer, press delete. Activate the original blurred layer, press delete and deselect.

Activate your frame layer again. Select all, float, defloat. Open paper of choice, copy and paste as a new layer on top of your frame. Invert the selection and press delete. Deselect.

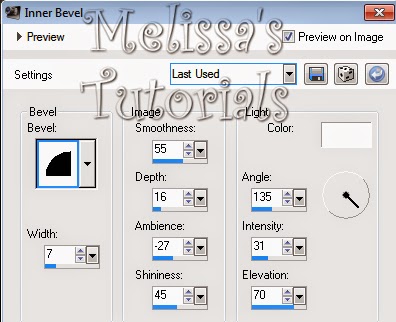
Merge the paper layer down onto the frame layer. Give it a slight inner bevel, I used this one:


Then give the frame a drop shadow, I used 0, 0, 80, 15.

Now we're going to copy our tube, paste as a new layer. Move it under the frame layer for now. My tube is cut off on the left side, so I'm going to move it over slightly to the left so you don't see the cut off part. Don't worry if you can see part of the tube through the holes of the frame, we'll fix that later.

On your tube apply Xero, Porcelain at default settings but be sure to move the blue slider to 0. Now give it a drop shadow. I use -3, 3, 60, 10. Then repeat the drop shadow but change the settings to 1, -1, 50. 5.

Let's take the time right now to resize our tag, cause it's just huge. I resized mine 80% all layers checked.

Now move your tube layer back on top of the frame layer again. Activate your selection tool. Now you're going to draw around the part of the tube that extends over the left side of the frame. (or right if yours is on that side). Be sure you go a little past the boundary, like below:


Now promote the selection to layer. Do NOT deselect yet. Activate the original tube layer, press delete 1 time and now you may deselect. Move the promoted layer under the frame.

If you can see parts of the promoted layer through the little frame holes then just select around those parts and press delete one time. Deselect.


Activate your main tube layer again. Should be on the top of your layer palette. You can now add any elements you like.

From Grab Bag g125, I used ele2, resized 40%. (be sure to uncheck the all layers box) Ele5, 30% and mirrored. Ele4, 50%. Ele3, 40% arrange at bottom, duplicate and flip, arrange at the top.

From Grab Bag 1128, I used ele1, 15%

Give all of your elements a drop shadow of -2, 2, 50, 5.

Now activate the bottom blurred layer under your frame. Select all, float, defloat. Activate the white background layer, invert selection and press delete, deselect. You need that white layer because you lowered opacity on the blurred layer and otherwise it'll look weird if it's on a colored background.

Now it's time to crop off the excess empty space around our tag. You're going to want to make sure you don't crop off any parts of tubes and drop shadows. Best way I've found to do this is to start on one side and activate the layer that sticks out the farthest. So I start with the left side and for me the red bow on top of the silver ornament sticks out farthest. So I click on my crop tool. It automatically snaps around the bow. If it doesn't you'll need to click on the "Snap crop rectangle to: Layer Opaque". I then use the nodes on the crop box to drag the top line all the way to the top of the canvas. The bottom line all the way to the bottom and the right line all the way to the right and click apply.

Now pick the layer that extends farthest on the right. For me that's the double ribbon under my main tube. So I leave the right border of the crop box where it is and drag the top, bottom and left sides all the way to the edge of the canvas and click apply.

Now we're going to do the same thing with the top and the bottom in the same fashion as before. For me those layers are the strings of Christmas lights. Though I gave it slightly more room on the bottom so there's enough room for when I add names.

By cropping in this fashion, doing each of the 4 sides individually, you insure that nothing ever gets accidentally cropped off. Especially drop shadows.

Add your copyright, license info and tagger's mark.

Add your name, I used the same color from my tube for both foreground and background. Give it a bevel of choice, I used:

Then give your name a gradient glow. I used these settings with the glow width at 3:


And then finally apply the same drop shadow you used for your elements.

Merge visible and save as a png or merge all and save as a jpg. Congrats, you're done!

Tuesday, April 29, 2014

Elegance - FTU

This tutorial was written by me on 04/28/2014 and assumes you have working knowledge of PSP. Any simularities to other tuts is purely coincidental and not done on purpose.
 

For this tut you will need:

PSP - I use version X3 but most versions will do
Tube of choice - I'm using the artwork of Anna Liwanag. You can buy it from CDO
Do not use this tube without purchasing a license first.
ScrapLHD_AmyMatthews-AprilFreebie cluster frame
Mask 4  from Chrissy Chaos
Font of choice, I used Monika
DBS Flux Bubbles
VM Natural Sparkle
Eye Candy 4000 Gradient Glow or any other filter with a gradient glow

Let's begin, remember to save often.
 
Open cluster frame in psp. Duplicate and close the original. Delete the credits layer. Add a new raster layer and drag it to the bottom. Activate the frame layer again and resize the frame 85%, all layers unchecked.
 
Change your foreground to a medium color from your tube or frame, I used #e06e82. Change your background to a matching lighter color, I used #e6b4ae. Click on your foreground color and make a foreground-background gradient with angle at 45, repeats 1, style linear. Add a new raster layer. Use your selection tool to draw around the black square part of the frame. Flood fill with your gradient and deselect. Drag this layer below your frame layer and duplicate. On the duplicate go to DBS flux, Bubbles and apply the filter with the settings of 30, 50, 17, 100.
 
You'll notice part of this layer now extends outside the frame, that's ok we'll fix it in a bit. With the bubble layer still active, change the blend mode to overlay. Activate the original flood filled layer. Select all, float, defloat, invert selection. Activate the bubble layer above it and press delete. Deselect. Merge down 1 time. With this layer still active, go to VM Natural and apply the Sparkle filter with these settings.
 
 
Apply the sparkle filter again, but move the random slider. Doesn't matter the number, just move it. I applied the sparkle filter to my frame one time also, but this is optional.

Activate the frame layer, give it a drop shadow of 0, 0, 60. 10.

Copy your tube and paste as a new layer. Move your tube layer under the frame layer. Arrange her where you want her to go as if she was on top. Give the tube a drop shadow of -3, 3, 60, 10. Repeat the drop shadow at 1, -1, 50, 5.

Now I noticed part of the tube was sticking out below the bottom of the frame, just use your selection tool to get rid of that. Keep the tube under the frame layer, we'll fix it before we're done.

Activate the raster 1 layer, should be at the bottom. Invert your gradient and change the repeats to 2. Flood fill your raster 1. Duplicate this layer, apply the DBS Flux, Bubbles filter again with the same settings. Change blend mode to overlay and merge down 1 time.

Add mask from image, merge group. Optional, click on your raster deform tool and drag the left and bottom nodes in so the mask is more evenly centered around your frame. With this layer still active, click on your crop tool and crop layer opaque. Make sure you're not cutting off any part of your tube, frame or drop shadows.

If you're going to resize your tag, now is the time to do it. I resized mine 80%, all layers checked.

Now activate your tube layer. Using your selection tool, you're going to draw around all parts of the tube that you want to sit on top of the frame, like so:


Make sure you won't be cutting off any drop shadows. Once you have your selection drawn, promote selection to layer. Activate the original tube layer and press delete. Deselect. Activate the promoted layer and bring this layer above the frame layer.

Add your copyright, license info and tagger's mark.

Change your foreground and background back to the solid colors you started out with. Add your name and give it an inner bevel, I used this one:


Then give it a slight gradient glow with the glow width at 3 and on color tab click on Medium and change it to a pale color from your tag. I used #fad0c9. Then apply a drop shadow of -2, 2, 50, 8.

Merge visible and save as a png or merge all and save as a jpg. Congrats, you're done!

Sunday, April 20, 2014

Mermaid - FTU

This tutorial was written by me on 04/20/2014 and assumes you have working knowledge of PSP. Any simularities to other tuts is purely coincidental and not done on purpose.


For this tut you will need:

PSP - I use version X3 but most versions will do
Animation Shop
Tube of choice - I'm using the artwork of Amy Brown. You can buy it from CDO
Do not use this tube without purchasing a license first.
04/18 Scrap Friday Grab Bag Freebie, scroll to bottom of page
Font of choice, I used Miss Le Gatees
Eye Candy 3.0 HSB Noise
Eye Candy 4000 Gradient Glow or any other filter with a gradient glow

Let's begin, remember to save often.

Open a new image 600 x 600, do NOT flood fill with a color, we'll fix that later. Open frame 1 from your grab bag scraps. Copy and paste as a new layer, resize 70%, all layers unchecked.

Open paper of choice, I used paper 6. Copy and paste as a new layer. Resize 55% and move below the frame layer. Activate the frame, click inside with your magic wand, expand by 6. Invert selection, activate the paper layer and press delete. Deselect. Give the frame a drop shadow of 0, 0, 80, 5.

Copy your tube and paste as a new layer. Make sure this layer is at the top of your layer palette. Give her a drop shadow of -3, 3, 60, 10, shadow on a new layer checked. Activate the tube layer again and repeat the drop shadow at 1, -1, 30, 5, again with the shadow on a new layer. Shadow 2 should be active, merge down one time.

Activate the tube layer again, and hide all layers except the tube. We're going to do some selecting so be sure to save your progress.

Zoom in about 500% and click on your freehand selection tool, set to point to point. Mode set to add, feather and smoothing at 0. We're going to select around the mermaid tail, start by selecting around the parts that are easy to get:


Now we're going to select around the harder parts, just carefully go along the lines, you can undo if you need to:


Once you have the entire tale selected, promote selection to layer. Deselect and duplicate this layer 2 times for a total of 3. Rename them from the bottom up as Tail 1, Tail 2 and Tail 3.

Activate the Tail 1 layer and go to Eye Candy 3.0, HSB Noise, apply the settings below:


Activate Tail 2, apply the filter again but change the random seed to 50. Repeat the filter on Tail 3 and change the random seed to 80.

Unhide the frame and tube shadow layers. Activate the tube shadow layer and click on your crop tool, crop layer opaque but make sure you don't crop off any part of the frame. I had to drag the bottom node down a bit to keep from cutting it off.

If you're going to resize your tag, do it now. I resized 90%, all layers checked.

Now hide all layers except the paper and frame layer. Activate the frame layer and duplicate, move the duplicate down below the original frame and hide the original frame layer. Lower the opacity on the duplicate frame to 40. Copy merged and paste as a new image in Animation Shop.

Click Effects, Insert Image Effect. Select Underwater and click on Customize, use these settings:


Click ok twice. The effect has now been applied. Delete the first and last frames in your animation. You should now have 9 frames. Scroll to the beginning and activate frame 1. Select all and minimize for now.

Back to psp. Hide the frame duplicate layer and the paper layer. And unhide all other layers except Tail 2 and Tail 3. Activate the top layer in your palette. Add your artist copyright, license info and tagger's mark.

Add your name using colors from your tube. Give it an inner bevel of choice, I used:


Then a simple white gradient glow with the glow width at 3:


Then give your name a drop shadow, I used -2, 2, 60, 10. Make sure you uncheck the shadow on a new layer box.

Now make sure these layers are hidden: Tail 2, Tail 3, the duplicate frame and the paper layer. The rest all need to be visible. Copy merged and paste as a new animation in AS. Back to psp, hide Tail 1 and unhide Tail 2. Copy merged and paste AFTER current frame in AS. Back to psp, hide Tail 2 and unhide Tail 3. Copy merged and paste AFTER current frame in AS.

You'll now have 3 frames. Click on frame 1 and select all. Copy, click on frame 3 and paste AFTER current frame. Click on frame 6 and paste AFTER current frame again. You should now have 9 frames. Scroll back and click on frame 1. Select all.

Unminimize your previous animation you made with the underwater effect. Frame 1 should be active and all frames selected. So now you're going to click on the first frame of your animation with the tube and text and drag it onto the first frame of the animation with the water effect. Line up the frame so it sits on top of the one with the lowered opacity and release the mouse button to drop into place. All 9 frames should of moved over to the exact location. If not, then undo and try again.

While all frames are still selected, press Alt Enter to bring up the frame properties box. Change the speed to 17. Then press Shift Alt Enter to bring up the animation properties box. Click on Opaque and change the color to white. Click ok and now your animation has a white background.

Save your tag and congrats, you're done!

Saturday, September 28, 2013

FTU Tut - Pumpkin's Bane


This tutorial was written on 09/27/2013 and assumes you have working knowledge of PSP. Any simularities to other tuts is purely coincidental and not done on purpose.

For this tutorial you will need:
PSP - I use X3 but most versions will do
Animation Shop
Eye Candy 4000 Gradient Glow
Tube of choice, I used the art of Tiffany Toland-Scott
You can purchase this tube at CDO. Do not use without purchasing a license first.
Freebie Cluster available on the CDO Designer blog
Font of choice, I used AcroterionJF

Open a new image 800 x 800. Flood fill white. Copy your cluster and paste as a new layer. I chose to mirror my cluster but this is optional. Now the grass is a bit sparce on one side. So using your selection tool, draw a selection around the grass like so:


Promote selection to layer and mirror. Use your Move tool to move the grass back over so it sits on top of the part that's a bit thin and move this layer down. Merge visible. It should now look something like this:


Give the cluster a slight drop shadow of -1, 2, 50, 5. Make sure the Vertical is negative 1 so the cluster doesn't look like it's floating.

Copy your tube and paste as a new layer. Resize if needed. I resized mine down 90%, all layers unchecked.

Move this layer under the cluster layer and arrange where desired. Your going want it to look like the cat and pumpkins are sitting in the grass. Once you're satisfied with the placement, move it back up again for now.

Use your freehand selection tool to select any areas that you want to sit on top of the cluster. I chose the leaves:


Promote selection to layer. Then click on the original tube layer and press delete. Deselect. Move your main tube layer under the cluster now and give it a drop shadow of -3, 2, 60, 10.

Activate the promoted layer and give it a drop shadow of 2, 2, 50, 5.

Now hide the white background layer and copy merged. Paste back onto your workspace as a new layer. Duplicate and mirror. Move the two layers so they're closer together and with the duplicate active, merge down. Give it a radial blur with these settings:


Move this layer to just above the white layer. Now use your raster deform tool to drag the nodes in so the blur is only slightly bigger then the cluster. Then activate your crop tool and crop layers opaque. Now resize the whole thing down if desired cause it is rather huge. I resized mine 70%, all layers checked.

Activate the top layer in your palette which should be the promoted selection. Add your copyright, license and tagger's mark. If using this same cluster be sure to include Scraps by Hungry Hill in your credits.

Add your name using colors from your tube. Give it an inner bevel of choice, I used:


Then give your name a slight gradient glow. This is what I used, the color is #eddac9:


Then a drop shadow of -2, 2, 50, 5.

To Animate:

Open your animation in AS, if you resized your tag down, you'll need to resize the animation too. I resized mine 80%.

Back to psp, hide the top 4 layers in your palette. Should be your name, the credits layer, the promoted selection and the cluster. The tube, the blur and the white background should be the only thing visible. Lower the opacity for the time being on the tube to 30%. You just want to be able to barely see it.

Copy merged and paste as a new animation in AS. Now you're going to need to make the same number of frames as the animation. My animation has 26 frames, so press ctrl shift L repeatedly until you have the required number of frames.

Scroll back and click on frame 1. Select all. Now activate your animation, make sure the first frame is active and select all on it also. Click and drag the first frame of your animation onto the first frame of your tag. All the other frames will drag along with it and place in the proper places. If you don't like the placement, undo on both and try again. I placed mine so the little orange dot on the left is above the left side of the small pumpkin:


When you're happy with placement then go back to psp. Return the opacity on the tube to 100% again and go to Layers, View and click on Invert. But then make sure you unhide the tube layer again. So now all layers should show but the blur and white background should be hidden.

Copy merged and paste as a new animation in AS. Make sure your Propagate Paste is enabled. If you're unsure there's an icon on the tool bar or you can go to Edit, Propagate Paste. Now with your existing animation that you added the sparkles to, should still be all selected. Click on your single frame and drag onto the first frame of your animation, lining the kitty up so it matches. The propagate paste will then place the same image in all frames. If you mess up you can undo and try again.

Save your tag and congrats, you're done!

Wednesday, April 3, 2013

7 new tags

This tag is from a tut by my friend Amber at Sweetest Serenity. You can find it here. Oh and if you do a Google search for the kit you can find it.

This tag is based on a tut by Monti. You can find it here.

This tag is from a tut by Sue. You can find it here.

This tag is from a tut by Zuzz. You can find it here.

This tag is from a tut by Stef. You can find it here.

This tag is from another tut by Monti. You can find it here. I used the Easter Collab that was available last month from CDO.

Wednesday, January 23, 2013

3 New Tags

I have 3 new tags to share with you ladies today. I still can't figure out why it's centering the post title, if anybody has a clue how to fix that, please leave a comment or email me or something.

This first tag is my own creation but I used this lovely cluster frame by Candylicious Designz. You can find it here.


This sexy tag is from a tut by Punky Butts. You can find it here. I really love how this one turned out.


And this last tag is from a tut by Millie's PSP Madness. You can find it here.

Friday, January 11, 2013

4 New Tags

I don't know why Blogger is suddenly centering the date and blog title, nor do I know how to fix it. But anyway here's some new tags I've made in the last week.

This tag is from a tut by Abstract. You can find it here. This is actually a tut for Photoshop but it can be done in PSP with adjustments. I did about half of it in PS before I got confused and just switched over to PSP. lol

 This tag is from a tut by Just Fi. You can find it here.

This tag is from a tut by Dave's Unique PSP. You can find it here.

This tag is from a tut by Millie's PSP Madness. You can find it here.

2 Tags from last month

Hello everyone, got behind on posting again so here's a couple tags that I actually made last month.

This tag is from a tut by Redefined Designs. You can find it here.

And this tag is from a tut by Tagalicious Tags & Tuts. You can find it here.

Friday, December 7, 2012

5 new tags plus new avatar to share

This tag is from a tut by Chas at chasscrapnbitz. You can find it here. I've had this link for probably a month but now have been holding back on doing it until I found a good tube to match. I have the exact tube she used in the tutorial and it's gorgeous but I try not to use the same tube if I can help it.


This tag is from a tut by Stef. You can find it here.


This next tag is from a tut on Freebie Friends, you can find it here.


This great PUT tag is from a tut by Jazzed Up Junk. You can find it here.


Last but not least, this adorable forum set is from a tut by Love Shack. You can find it here. I also made avatars to share and you can find them here.