Tuesday, April 29, 2014

Elegance - FTU

This tutorial was written by me on 04/28/2014 and assumes you have working knowledge of PSP. Any simularities to other tuts is purely coincidental and not done on purpose.
 

For this tut you will need:

PSP - I use version X3 but most versions will do
Tube of choice - I'm using the artwork of Anna Liwanag. You can buy it from CDO
Do not use this tube without purchasing a license first.
ScrapLHD_AmyMatthews-AprilFreebie cluster frame
Mask 4  from Chrissy Chaos
Font of choice, I used Monika
DBS Flux Bubbles
VM Natural Sparkle
Eye Candy 4000 Gradient Glow or any other filter with a gradient glow

Let's begin, remember to save often.
 
Open cluster frame in psp. Duplicate and close the original. Delete the credits layer. Add a new raster layer and drag it to the bottom. Activate the frame layer again and resize the frame 85%, all layers unchecked.
 
Change your foreground to a medium color from your tube or frame, I used #e06e82. Change your background to a matching lighter color, I used #e6b4ae. Click on your foreground color and make a foreground-background gradient with angle at 45, repeats 1, style linear. Add a new raster layer. Use your selection tool to draw around the black square part of the frame. Flood fill with your gradient and deselect. Drag this layer below your frame layer and duplicate. On the duplicate go to DBS flux, Bubbles and apply the filter with the settings of 30, 50, 17, 100.
 
You'll notice part of this layer now extends outside the frame, that's ok we'll fix it in a bit. With the bubble layer still active, change the blend mode to overlay. Activate the original flood filled layer. Select all, float, defloat, invert selection. Activate the bubble layer above it and press delete. Deselect. Merge down 1 time. With this layer still active, go to VM Natural and apply the Sparkle filter with these settings.
 
 
Apply the sparkle filter again, but move the random slider. Doesn't matter the number, just move it. I applied the sparkle filter to my frame one time also, but this is optional.

Activate the frame layer, give it a drop shadow of 0, 0, 60. 10.

Copy your tube and paste as a new layer. Move your tube layer under the frame layer. Arrange her where you want her to go as if she was on top. Give the tube a drop shadow of -3, 3, 60, 10. Repeat the drop shadow at 1, -1, 50, 5.

Now I noticed part of the tube was sticking out below the bottom of the frame, just use your selection tool to get rid of that. Keep the tube under the frame layer, we'll fix it before we're done.

Activate the raster 1 layer, should be at the bottom. Invert your gradient and change the repeats to 2. Flood fill your raster 1. Duplicate this layer, apply the DBS Flux, Bubbles filter again with the same settings. Change blend mode to overlay and merge down 1 time.

Add mask from image, merge group. Optional, click on your raster deform tool and drag the left and bottom nodes in so the mask is more evenly centered around your frame. With this layer still active, click on your crop tool and crop layer opaque. Make sure you're not cutting off any part of your tube, frame or drop shadows.

If you're going to resize your tag, now is the time to do it. I resized mine 80%, all layers checked.

Now activate your tube layer. Using your selection tool, you're going to draw around all parts of the tube that you want to sit on top of the frame, like so:


Make sure you won't be cutting off any drop shadows. Once you have your selection drawn, promote selection to layer. Activate the original tube layer and press delete. Deselect. Activate the promoted layer and bring this layer above the frame layer.

Add your copyright, license info and tagger's mark.

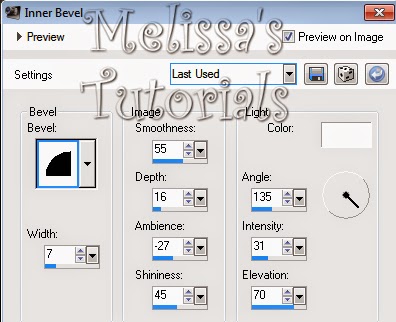
Change your foreground and background back to the solid colors you started out with. Add your name and give it an inner bevel, I used this one:


Then give it a slight gradient glow with the glow width at 3 and on color tab click on Medium and change it to a pale color from your tag. I used #fad0c9. Then apply a drop shadow of -2, 2, 50, 8.

Merge visible and save as a png or merge all and save as a jpg. Congrats, you're done!

Sunday, April 20, 2014

Mermaid - FTU

This tutorial was written by me on 04/20/2014 and assumes you have working knowledge of PSP. Any simularities to other tuts is purely coincidental and not done on purpose.


For this tut you will need:

PSP - I use version X3 but most versions will do
Animation Shop
Tube of choice - I'm using the artwork of Amy Brown. You can buy it from CDO
Do not use this tube without purchasing a license first.
04/18 Scrap Friday Grab Bag Freebie, scroll to bottom of page
Font of choice, I used Miss Le Gatees
Eye Candy 3.0 HSB Noise
Eye Candy 4000 Gradient Glow or any other filter with a gradient glow

Let's begin, remember to save often.

Open a new image 600 x 600, do NOT flood fill with a color, we'll fix that later. Open frame 1 from your grab bag scraps. Copy and paste as a new layer, resize 70%, all layers unchecked.

Open paper of choice, I used paper 6. Copy and paste as a new layer. Resize 55% and move below the frame layer. Activate the frame, click inside with your magic wand, expand by 6. Invert selection, activate the paper layer and press delete. Deselect. Give the frame a drop shadow of 0, 0, 80, 5.

Copy your tube and paste as a new layer. Make sure this layer is at the top of your layer palette. Give her a drop shadow of -3, 3, 60, 10, shadow on a new layer checked. Activate the tube layer again and repeat the drop shadow at 1, -1, 30, 5, again with the shadow on a new layer. Shadow 2 should be active, merge down one time.

Activate the tube layer again, and hide all layers except the tube. We're going to do some selecting so be sure to save your progress.

Zoom in about 500% and click on your freehand selection tool, set to point to point. Mode set to add, feather and smoothing at 0. We're going to select around the mermaid tail, start by selecting around the parts that are easy to get:


Now we're going to select around the harder parts, just carefully go along the lines, you can undo if you need to:


Once you have the entire tale selected, promote selection to layer. Deselect and duplicate this layer 2 times for a total of 3. Rename them from the bottom up as Tail 1, Tail 2 and Tail 3.

Activate the Tail 1 layer and go to Eye Candy 3.0, HSB Noise, apply the settings below:


Activate Tail 2, apply the filter again but change the random seed to 50. Repeat the filter on Tail 3 and change the random seed to 80.

Unhide the frame and tube shadow layers. Activate the tube shadow layer and click on your crop tool, crop layer opaque but make sure you don't crop off any part of the frame. I had to drag the bottom node down a bit to keep from cutting it off.

If you're going to resize your tag, do it now. I resized 90%, all layers checked.

Now hide all layers except the paper and frame layer. Activate the frame layer and duplicate, move the duplicate down below the original frame and hide the original frame layer. Lower the opacity on the duplicate frame to 40. Copy merged and paste as a new image in Animation Shop.

Click Effects, Insert Image Effect. Select Underwater and click on Customize, use these settings:


Click ok twice. The effect has now been applied. Delete the first and last frames in your animation. You should now have 9 frames. Scroll to the beginning and activate frame 1. Select all and minimize for now.

Back to psp. Hide the frame duplicate layer and the paper layer. And unhide all other layers except Tail 2 and Tail 3. Activate the top layer in your palette. Add your artist copyright, license info and tagger's mark.

Add your name using colors from your tube. Give it an inner bevel of choice, I used:


Then a simple white gradient glow with the glow width at 3:


Then give your name a drop shadow, I used -2, 2, 60, 10. Make sure you uncheck the shadow on a new layer box.

Now make sure these layers are hidden: Tail 2, Tail 3, the duplicate frame and the paper layer. The rest all need to be visible. Copy merged and paste as a new animation in AS. Back to psp, hide Tail 1 and unhide Tail 2. Copy merged and paste AFTER current frame in AS. Back to psp, hide Tail 2 and unhide Tail 3. Copy merged and paste AFTER current frame in AS.

You'll now have 3 frames. Click on frame 1 and select all. Copy, click on frame 3 and paste AFTER current frame. Click on frame 6 and paste AFTER current frame again. You should now have 9 frames. Scroll back and click on frame 1. Select all.

Unminimize your previous animation you made with the underwater effect. Frame 1 should be active and all frames selected. So now you're going to click on the first frame of your animation with the tube and text and drag it onto the first frame of the animation with the water effect. Line up the frame so it sits on top of the one with the lowered opacity and release the mouse button to drop into place. All 9 frames should of moved over to the exact location. If not, then undo and try again.

While all frames are still selected, press Alt Enter to bring up the frame properties box. Change the speed to 17. Then press Shift Alt Enter to bring up the animation properties box. Click on Opaque and change the color to white. Click ok and now your animation has a white background.

Save your tag and congrats, you're done!

Friday, April 11, 2014

Lovely In Lace - PTU

This tutorial was written by me on 04/11/2014 and assumes you have working knowledge of PSP. Any simularities to other tuts is purely coincidental and not done on purpose.


For this tut you will need:

PSP - I use version X3 but most versions will do
Tube of choice - I'm using the artwork of Dave Nestler. You can buy it from CDO
Do not use this tube without purchasing a license first.
ScrapBCS_Daylily_sm scrapkit by Baby Cakes Scraps
You can purchase this kit at CDO
Mask 63 by Bitzy Bees Designz
Font of choice, I used DianaCTT
Eye Candy 4000 Gradient Glow or any other filter with a gradient glow

Let's begin, remember to save often.

Open a new image 600 x 600. Open element 11 from your kit, copy and paste as a new layer, resize 60%, all layers unchecked. Now I wanted my frame to be just a slightly darker color to better match my tube. So I clicked on my foreground box in the color palette, clicked on a medium purple color on the tube and then before you click ok, take note of the Hue and Saturation numbers:


Then go to Adjust, Hue and Saturation, Colorize. Enter the numbers you just made note of and it'll change the element to match that color. Sometimes it doesn't change it exactly and you have to play around with it, but for mine it did it just as I wanted.

Now click on your preset shape tool, choose Ellipse. Draw circle, width 8. Your foreground color should be the same as you just colorized your frame. Background null. Hold down the shift key and draw a circle about the same size as the inner part of the frame. While it's still a vector layer go to objects, align, center in canvas. Now on the tool options bar, click on the Edit Mode button, this will bring up the nodes and you can make adjustments so it fits evenly around the frame. I placed mine so it's just inside the frame, here I'll show you in a contrasting color so you can see what I mean:


When you're satisfied with how it looks, convert to raster and move under the frame layer and rename this layer small circle frame.

Activate the bottom layer in your palette. Open a paper of choice from your kit, I used paper 5. Copy and paste as a new layer on your tag. Activate the small circle frame layer, click inside with your magic wand. Expand by 3, invert selection. Activate the paper layer and press delete. Deselect.

Activate the top frame layer in your palette. Copy your tube and paste as a new layer. Line it up where you want it to sit. Give her a drop shadow of -3, 3, 60, 10. Repeat the drop shadow at 1, -2, 50, 5. Move this layer under the small circle frame layer for now.

With your tube layer still active, hide the top frame layer and zoom in about 300%. Click on your freehand selection tool. Set to point to point, feather at 0. Click along the frame and then around the part of the tube you don't want to show below the frame. Make sure you go far enough around the bottom of the tube so that any parts of the drop shadow will be removed as well:


Make sure your tube layer is active and press delete. Deselect. Unhide the top frame layer and give it a slight drop shadow of 0, 0, 60, 10.

Now activate the tube layer once more. Zoom in about 200% and click on your selection tool. Draw a selection around the top of the tube to just under the top part of the frame. Make sure again that you're not going to cut off any drop shadow on the tube:


Ok now promote selection to layer. Go back and click on the original tube layer and press delete and deselect. Activate the promoted layer, and move to the top of your layer palette so it sits on top of the frame layer.

Open element 23, copy and paste as a new layer, resize 60%. I colorized mine as I did my frame, but this is optional. Place at the top of the frame but under the promoted tube layer, see my tag for reference. Give it a drop shadow of 0, 0, 80, 10. Now I had a small part of the ribbon that was poking out below the promoted section of my tube. That's easy to fix by just zooming in, use your selection tool to draw just around the part that's sticking out and press delete:


Open element 22, copy and paste as a new layer, resize 50%. Place to the left side of the frame and give it the same drop shadow as you did the ribbon.

Open elements 5, 6 and 7. Copy and paste each one on your tag. Resize all 3 by 30%. Element 5 I mirrored. Arrange the 3 elements on the right side of the frame. Duplicate the flower and mirror again. Resize 80% and move down a little bit on the canvas. Give each of those 4 layers the same drop shadow as before and with the top one active, merge down 3 times till they're all on the same layer.

Now move this layer under the original tube layer. And we're going to do just like we did with the tube. Zoom in about 400%. Click on your freehand selection tool, same settings as before and draw around the side of the frame so you're going around the parts of the stems that stick out the side like so:


Press delete when you're done and deselect. Now you're going to do the same thing with the top part of the flowers, like so:


Promote selection to layer. Go back to the original and press delete, deselect and move the promoted layer to the top of the layer palette.

Open element 13, copy and paste as a new layer, resize 40%. Give it the same drop shadow but change the opacity to 60. Move to the bottom right of the frame, see my tag for reference.

Activate the bottom layer in your palette. Copy and paste a paper of choice, I used paper one. Resize 75%. Add mask from image. If using the same mask as me, be sure to invert the mask data. Merge group and resize 90%.

With your mask layer still active, click on your crop tool. Click on crop layer opaque if it doesn't automatically snap around the mask. Now on mine the head of my tube extended beyond the mask so I clicked on the top node and dragged it to just beyond the drop shadow of the tube so it wouldn't get chopped off.

Activate the top layer in your palette, if you're going to resize, do it now. I resized my tag by 85%, all layers
checked.

Add your copyright, license and tagger's mark. Be sure to credit the scrap kit if required.

Add your name using colors from your tube. Give it an inner bevel:


Then a gradient glow with the glow width at 3 and the color like this. The purple is the same color I used for the background on my name:


Then you can give your name a drop shadow of -2, 2, 60, 5.

Merge visible and save as a png or merge all and save as a jpg. Congrats, you're done!