Showing posts with label Templates. Show all posts

Friday, April 13, 2018

CT Tags - Freeks Creations - Clover Crazy


2 tags to show off today featuring this clover packed kit by Freeks Creations. You can find this kit at Mystical Scraps here

Yes I realize that I am posting St. Patrick's Day tags in April but I had very limited computer usage during February and March. 

I paired this kit with the art of Anna Liwanag. You can find this tube at CDO here.


And with the art of VeryMany. You can find it on her site here.


There is also Incredimail letters matching both tags. Click the previews below to download.


Wednesday, January 31, 2018

CT Tags - Freeks Creations

I have 2 tags and matching wallpaper for the first tag, using this adorable Valentine's kit by Freeks Creations.


You can find this kit at Mystical Scraps here.

For my first tag, I paired this kit with the art of Fiodorova_Maria, you can find this tube at PicsForDesign. I also used a fantastic template from Dee at Dangerously Delicious Designs. You can also find wallpaper to match this tag HERE.


For my second tag, I used this adorable kitty tube from VeryMany


Sunday, April 3, 2016

Grow With Love - PTU Scraps

This tutorial was written by me on 04/02/2016 and assumes you have working knowledge of PSP. Any similarities to other tuts is purely coincidental and not done on purpose. 


For this tut you will need:
PSP - I use version X3 but most versions will do
Tube of choice, I used this lovely Exclusive Ellie_Milk tube from PicsForDesign
Scrap Kit of choice, I used All Things Grow With Love by Monti's Scraps
You can find this kit and many others at CDO
Template 31 by K'Lani Designs
Geo Mask 8 by Dees'Sign Depot
Font of choice, I used Scriptina
Filters used:
Xero Porcelain
Eye Candy 4000 Gradient Glow

Let's begin, remember to save your progress often.

Open your template and tube, duplicate both and close the originals. Open your mask and minimize for now. On your template, delete the credits layer. Increase canvas size to 700 x 600, center placement. Activate the background layer and flood fill white.

Activate layer 5. Select all, float, defloat. Open a paper from your kit. I chose paper 4. Copy and paste as a new layer. Promote to selection. Do not deselect yet. Activate layer 5 again. Expand selection by 3. Press delete on your keyboard to remove the original shape and then flood fill with a color from your kit or tube. I used the pale peach color. Deselect and give it noise with the settings at Uniform, 80%, monochrome checked. Activate the promoted selection layer with the paper and merge down 1 time. Give this layer a drop shadow of 0, 0, 70, 10. You may now delete the original paper layer.

Now we're going to add papers to the circles below the layer we just worked on. I used 1 paper for layers 6 & 7. And then another paper for layers 8 & 9. If you choose to do this then click on layer 6, merge down 1 time. Then click on layer 8 and merge down 1 time. Skip this step if you plan on doing a different paper on all 4 circles.

So now layer 9 should be active. Select all, float, defloat. Open a paper from your kit, I used paper 1. Copy and paste as a new layer. Promote to selection. Do not delect yet. Now we're going to do like we did with layer 5. Make sure layer 9 is active again. Expand selection by 3. Press delete on your keyboard to remove the original shape(s), flood fill with the same color as used before. Deselect and give it the same noise as before. Activate the promoted paper layer and merge down 1 time. Give it the same drop shadow as before. Then delete the original paper layer.

Repeat this entire process again with layer 7 using another paper from your kit. I used paper 3. Don't forget to drop shadow when you're done.

Activate layer 4. Select all, float, defloat. You could add a paper as before but I chose to flood fill with a color from my kit. I used the dark pink. With it still selected, expand by 3. Add a new layer, flood fill with the same color as before or different if that is your choice. Deselect, give it the same noise as before. Move this layer below layer 4 and drop shadow. Activate layer 4 and merge down 1 time.

Activate layer 3 and repeat as you did with layer 4. I flood filled this one with the same pale peach as used for the glitter borders and deselect. Do NOT give it a border or a drop shadow however.

With layer 3 still active, copy and paste your tube as a new layer. Resize as needed. Move it to one side of the strip, with just the face covering the strip. Activate the strip layer again, select all, float, defloat. Activate the tube layer, promote to selection. Deselect and delete the original tube layer. Activate your promoted tube, duplicate and mirror. Merge the tube duplicate down 1 time. Apply Xero Porcelain at default settings but move the blue slider to 0. Change the blend mode to Multiply or one that suits your tube/colors.

Activate layer 2. Select all, float, defloat. Open a paper from your kit. I used paper 5. Copy and paste as a new layer. Invert selection, press delete and deselect. Merge the paper layer down 1 time onto layer 2.

With this layer still active, copy and paste a close-up of your tube as a new layer. Mirror if needed so it'll face the opposite direction as your main tube. Arrange inside the frame. Activate layer 2 again, select all, float, defloat. Activate the close up tube, promote to selection. Deselect and delete the original close up tube layer.

Activate the white background layer. Select all. Crop to selection. Activate the promoted close up tube layer again. Apply the Xero Porcelain but change the strength to 98. Apply it a second time. Change the blend mode to Luminance and the opacity to 80%. Duplicate this layer and change the blend mode to Screen.

Activate layer 1 and do as you did with the other shapes using a paper from your kit. I used paper 2. Once you have your paper on there, give it very light noise at 30% and the other settings the same. Give it the same drop shadow but change the opacity to 50%.

Copy and paste your main tube as a new layer. Resize if needed. Move the tube layer under the frame layer and line it up how you like it. Keep it under the frame layer for now.
 
Optional: My tube when I moved her where I wanted her, the top of her head went past the top end of the canvas. To fix that, increase canvas size with the placement at the bottom so you'll give it more room at the top. Be sure to allow extra space for when you'll add the drop shadow and mask. I added 50 more pixels to the top for mine.

With your main tube active, give it the same Xero Porcelain as we did the close up, just only once. Give her a drop shadow of 0, 0, 60, 10. Keep her under the frame, we'll fix her when it is time. Using your selection tool set to point to point, draw a line along the bottom of the frame wherever the tube might be sticking out. Make sure you draw out and around the bottom of the tube, counting for drop shadow. When it's fully selected, press delete on your keyboard and deselect.

Now it is time to start adding our elements. Be sure to save your progress.

Open element 20, the half circle of leaves. Copy and paste as a new layer. Resize 110%, all layers unchecked. Move this layer to just above your white background layer and then arrange it so you can see the leaves sticking out around the template. Duplicate this layer and flip, then mirror. Arrange the duplicate so it's at the bottom of the template. See my tag for reference. Once you have the two half circles of leaves lined up how you like them, make sure the duplicate is active, merge down 1 time and give it a drop shadow of 0, 0, 60. 7. We'll use this drop shadow for almost all of our elements, so keep it in mind.

Activate the top layer in your palette. Open element 13, the grassy mound with mushrooms. Copy and paste as a new layer, resize as needed. I resized mine 40%. Arrange on the left side of the template, just above your Layer 5. See my tag for reference.

Open element 7, the little tree with roses on it. Resize as needed, I resized mine 45%. Arrange on the right side of the template, across from the mushrooms.

Open element 18, the pretty pink and white bird. Resize as needed, I resized mine 15%. Move it to the top in your layer palette and place it on the right side of the frame.

Open element 21. Copy and paste as a new layer. Flip and arrange near the bottom of the template, under the frame background layer. See my tag for reference. Drop shadow this one with the opacity at 40%.

Add any other elements of choice and then hide your white background layer. Crop Merged Opaque. Increase canvas size again with a 15 pixel increase on all 4 sides. Activate your background layer.

Add a new raster layer, select all. Open a paper from your kit. I used paper 5 again. Copy and paste into selection, deselect. Add mask from image and merge group. With your background layer still hidden, crop merged opaque a second time. This gets rid of any excess canvas without accidently cropping tubes, drop shadows, etc. Now is the time to resize your tag if you want to do that. I resized mine 72%, all layers checked.

Now that the resizing is done, it's time to fix our main tube. Activate the main tube layer. Using your selection tool. Draw a selection around the part of the tube that needs to sit above the frame. Make sure you allow enough space for the drop shadow:


Promote selection to layer. Activate the original tube layer and press delete. Deselect and move the promoted layer above the frame.

Add your copyright, license and tagger's mark. Don't forget to credit the scrap kit if required.

Add your name using colors from your kit/tube. Give it an inner bevel. I used this one:


Then add a gradient glow, I used these settings with the glow width at 3:


And then finally, drop shadow your name, I used -2, 2, 50, 5.

Delete your white background layer. Merge visible and save as a png or merge all and save as a jpg. Congrats, you're done!

Sunday, January 24, 2016

Make My Heart Blue - PTU Scraps

This tutorial was written by me on 01/24/2016 and assumes you have working knowledge of PSP. Any similarities to other tuts is purely coincidental and not done on purpose.


For this tut you will need:
PSP - I use version X3 but most versions will do
1 or 2 tubes of choice, I'm using the art of PinupToons, available at CDO
Do not use this tube without purchasing a license first. 
Scrap kit of choice. I'm using:
CDO 50 Shades Of Romance Collab 2016
Template 30 by K'Lani Designs
Font of choice, I'm using Majestic
Filters used:
Mura Meister Copies
Xero Porcelain
Eye Candy 4000 Gradient Glow

For this tag, most of the scraps are from Babycakes's portion of this collab. Pieces from other designer's portions of the collab will be specified.

Let's begin, remember to save often so you don't lose your work.

Open your template, duplicate and close the original. Delete the top credit layer. Increase canvas size to 730 x 600. This gives us more room to work with. Activate and unhide the bottom white layer and flood fill in the extra space with white.

With your white layer still active, go to Layers, view, click on Current Only. Now unhide layers 13 and 14 and activate layer 13. Open a paper of choice, I used paper 4, copy and paste as a new layer. Resize if needed, I resize 60%, all layers unchecked. So it's only slightly bigger then the shape. Then move it so it covers the shape and activate layer 13 again. Select all, float and defloat. Invert selection, activate paper layer and press delete. You may now deselect.

Optional: Activate layer 13, press delete on your keyboard, this should make the layer empty. Click on the paper layer and merge down 1 time. Do this is with each layer that has paper added to it. This keeps all of our layers properly numbered and removes the slight grey outline around the paper.

Unhide layers 11 and 12. Repeat the steps above with layer 11 and a different paper from your kit. I used paper 1.

Unhide layers 7, 8, 9 and 10. Activate layer 7. Copy and paste another paper of choice. I used paper 2. Resize this one 65%. Duplicate paper and move the duplicate above layer 8. Hide the duplicate for now and activate layer 7 for now. We're going to do as we did before with layers 11 and 13. Except you'll use the duplicate paper on layer 8. Move layer 7 to just under layer 9.

Finally let's add a paper to layer 1. I used paper 3 and had to resize this one 70% as that's a wider rectangle. Activate layer 1 again, do the standard of select all, float and defloat. But before you go any further, arrange the paper if you want. I moved mine down on the tag so that the approximate center of the paper was over the center of the rectangle. When you have it how you like it then do the same as you did with the other shapes, inverting the selection and deleting the excess. Be sure to deselect when done.

I chose to leave layers 3 and 5 alone for my tag. You could add papers if you so choose.

Now we're going to add noise to layers 14, 12, 10, 9, 6, 4 and 2. Apply it with the settings at Uniform, 100% and monochrome checked. The same settings for all of those layers. To those exact same 7 layers, apply a drop shadow of 0, 0, 80, 10. Be sure you're only applying the shadow to the layers you applied the noise.

Ok so the template is done, let's add our elements. Make sure the top layer in your palette is active before you add each item. Give them all the same drop shadow as before unless otherwise specified, which is 0, 0, 80, 10. See my tag for reference on where to place each item.

Element 22, resize 50%. Apply Mura Meister Copies with these settings. You might have to adjust them if you're using a different element. Oh and it's set to Encircle. Oops lol
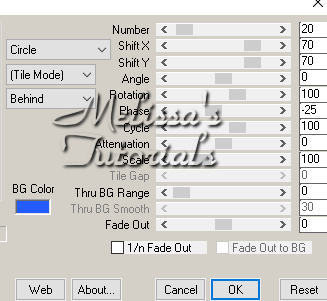

Arrange this layer above your white background layer.

Element 28, arrange to the top right behind layer 6. See my tag for reference. Duplicate the layer and mirror. Do NOT drop shadow these layers.
Element 16, mirror and resize 60%. Arrange to the bottom left side of the tag on top of layer 1.
Element 8, mirror and resize 65%. Arrange in front of the heart.
Element 7, resize 95% and arrange on the bottom right side of the tag.
Element 30, mirror and resize 50%. Arrange in front of the thorny heart. When you drop shadow this one, make sure the opacity is 50.

Ok the rest of the elements are from other designer's portions of the collab.
From ChiChi Designs, the Net element. Resize 60%, arrange at the top right of the tag. Move this layer under the encircled element layer. Duplicate, flip and arrange at the bottom left. The drop shadow on these layers is 0, 0, 50, 5.

From Monti's Scraps, open element 10. Duplicate and close the original. Colorize with the hue and saturation at 0. Now we're going to use our Manual Color Correction tool. If you've never used this fantastic tool before, my friend Fi has a tut for it right here.

So now we're going to change the color of this item from the grey to one that will match our tag. So for mine, since I'm using blues, I set the source color to #7a7a7a and the target color to #143fad. Now copy and paste your new colored element onto your tag. Arrange in the top left corner so only the part that looks like lumpy bricks are showing. Duplicate, flip and move this layer to the bottom right corner. Arrange both of these layers to just above the white background. Do NOT drop shadow these 2 layers

From Ladyhawwk Designs, element 7. Resize 80% and arrange above Layer 1 but below the 4 top elements you've added already. Do NOT drop shadow this layer either.

From Rebel Dezigns, element 4. We're going to colorize this one also to match the tag but we'll do this one slightly different. Before adding it to our tag, duplicate and close the original. Zoom in about 200% so you can better see what you're doing. Using your selection tool, draw a selection on just the candle part, ignoring the candle holder and the flame.


 Now with the candle selected, promote to layer, activate the original and press delete, deselect. Working on the promoted layer, colorize it grey again like we did Monti's element. And we're going to use our manual color correction tool to change it to approximately the same shade of blue. So the source color to use is #464646. Keep the target color the same. When you're done merge the promoted layer back down onto the layer with the candle holder.

Copy and paste as a new layer on your tag. Resize 60%, arrange on the bottom right above the black lips. Duplicate and mirror.

So that's all of our elements, don't forget to give them the specified drop shadows (or not if stated).

Now it's time to add our main tube. Resize if needed, I resized 95%. Arrange her where you like her. Duplicate and hide the duplicate for now. On the original apply Xero Porcelain with default settings but change the strength to 98 and move the blue slider to 0. Give this layer a drop shadow of -3, 3, 60, 10. Repeat the drop shadow at 1, -1, 40, 5.

Activate and unhide the duplicate, give it a gaussian blur of 2. Change the blend mode to soft light, or one that fits your tube and reduce opacity to 60.

Now we're going to add a 2nd tube or you could use a close-up of your main tube. For my tag, the 2nd tube was the August 2015 bonus tube. Activate layer 3 in your palette. Copy and paste your tube as a new layer. Resize if needed. Arrange her so you can see her the part of her face you want in the top part of the black diamond. To make it easier, activate the black diamond layer, select all, float and defloat. Then arrange the tube where you want it.

When you have the tube on the left side arranged, deselect. Duplicate your tube and mirror. Move this layer down in your layer palette till it's above layer 5. Select all, float and defloat layer 5 and use that to arrange the right tube. When that's how you like it, invert selection, activate tube layer and press delete. Do that with the left tube layer as well.

The reason I had you wait till after both tubes are arranged to remove the excess is because you might want them in slightly different positions, as I did with my right tube.

Change the blend mode of both those tube layers to Luminance Legacy.

If you're going to resize your tag, now is the time to do it. I resized mine 70%, all layers checked.

Add your copyright, license and tagger's mark. Add scrap kit credits also, if required.

Add your name using your font of choice, colors from your tag/tube. If desired, while it's still a vector layer, grab the top middle node and drag it upwards, making your name taller.


Apply an inner bevel of choice, I used this one.


Give it gradient glow, I used these settings.


Then give your name a drop shadow, I used -2, 2, 50, 5. Delete the white background layer, merge visible and save as a png, or merge all and save as a jpg. Congrats, you're done!

Monday, September 7, 2015

Proud Stalker - PTU Scraps

This tutorial was written by me on 09/07/2015 and assumes you have working knowledge of PSP. Any similarities to other tuts is purely coincidental and not done on purpose.
 
 
For this tut you will need:
PSP - I use version X3 but most versions will do
Pack 66 from Cuddly Rigor Mortis or tubes of choice
Ladyhawwk Designs or kit of choice.
You can purchase both tubes and kit from CDO
Do not use without purchasing a license first
Font of choice, I used Carl Beck Script
Eye Candy 4000 gradient glow
 
Let's begin. This tag has a lot of layers. It's very important that you save often as you go.
 
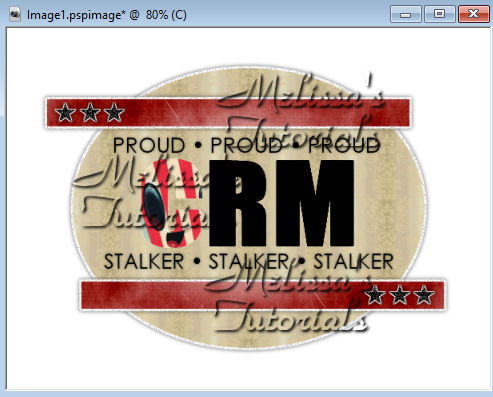
Open your template in psp. Duplicate and close the original. Delete the credits layer. Unless you're going to be using Rac tubes, delete the xeracx layer. You're going to put the artist's name on there that you're using. For my example tag I'm using Cuddly Rigor Mortis, or CRM for short. You need to be sure you have as many tubes as the letters of your artist's name, plus your main tube, unless you wanted to repeat one of the tubes.
 
Click on your text tool. Font is Impact, it's a windows font so it should be already on your computer. Foreground and background black, stroke 1. Size 100. Click in the center of your template. In all Caps, type out your artist's name. Align center of your canvas. Using the vector nodes, drag your name larger if needed. When you're satisfied with size and placement, convert to raster. Rename this layer the name of the artist.
 
Activate your white background layer. Increase canvas size to 603 x 451. Flood fill the empty parts white again.

Activate the shape layer. Select all, float, defloat. Copy a paper of choice, I used paper 5. Paste as a new layer. Invert selection and press delete and deselect. Delete the original shape layer.

Activate the thin rectangle2 layer. Copy and paste another paper of choice. I used paper 6. Resize the paper layer so it's just a little bigger then the rectangle is wide. I resized mine 60%. Make sure all layers is unchecked. Align the paper up with the top rectangle so the part of the paper you want to show is covering it:


Activate the rectangle2 layer again. Select all, float, defloat and invert. Activate the paper layer again and press delete and deselect. Duplicate the paper layer. Mirror and then flip. You might have to arrange it a bit so it covers the bottom rectangle. Your duplicate paper layer should be on top of the original paper layer in your palette. Merge down 1 time and delete the 2 original rectangle layers. It should now look like this:


Activate the stalker layer and move it down in the layer palette so it's above the proud layer. Merge down 1 time. With this layer active, click on your Manual Color Correction tool. We're going to change the pink of the text to a color to match our main tube. So your source color is the pink. I put the color code on the screenshot below. The target color is the color your changing it to, I used black.


Activate the while background layer. Select all. Crop to selection to get rid of any paper that might be off canvas.

Activate shape layer again. Select all, float, defloat. Expand selection by 3. Add a new raster layer and flood fill white. Deselect and move the white layer under the shape layer. Add noise at Uniform, 50%, monochrome checked. Give this layer a drop shadow of 0, 0, 60, 8.

Activate the layer with the 2 rectangles and repeat as above.

Activate the stars2 layer. Merge down 1 time and rename stars. Add noise to the stars but this time at 100%. Select all, float, defloat. Expand by 2. Add a new raster layer and flood fill white. Deselect and move the white layer under the stars layer. Give it the same drop shadow as above. Activate the layer with the proud stalker lines and give them a drop shadow of 0, 0, 50, 5.This is what you should have so far.


Have you saved your progress? Do it now, cause now it's about to get harder. Activate the artist layer. Copy and paste all of the tubes that are going to go within the names as new layers. Resize each down so they're about the size as the parts you want in the letters. To make sure they're where you want them, select all, float, defloat. Then you can move them where you need to. If you need to resize 1 or more, deselect, resize as needed and then do the selections part again just to see if it's where you want it. So when you're done it'll look kinda like this.


Now deselect as we're going to add each tube one at a time to the letters. So hide the tubes that are going to be in the letters. Activate the artist layer again. Mine is labeled CRM as that's the artist I'm using. Select your magic wand with match mode at RBG value, tolerance and feather at 0. Click inside just the first letter. Unhide that first tube and activate it. Invert selection and press delete. Deselect and rename this layer the matching letter. So for mine, it's the letter C so that's the name of this layer with the tube.


Activate the artist layer again. Click inside your second letter with your magic wand. Again, unhide and activate the tube you arranged for that layer. Invert selection and press delete. Deselect and rename that layer the matching letter. Continue doing this for each of the letters and matching tubes. When done it'll look like this:


And your layer palette should be like this:


Now, hide just those tube letter layers, so for me it's the top 3 layers. Invert view and merge visible. Change view back to all. Rename this layer tubes:


While still on the tubes layer. Select all, float, defloat. Go up to selections, modify and click on Set Selection Borders. Border width is 1, both sides ticked and anti-alias checked. Add a new raster layer, and flood fill with a complimentary color to your tubes. I chose black. Don't forget to get the little parts inside letters like O, P and R. I missed that on my original tag. lol Deselect when done and activate the tubes layer again and give it a drop shadow of 0, 0, 80, 12. You can now delete the original artist name layer.

Make sure the top layer in your palette is active. Now it's time to start adding some elements from our kit. Copy element 22 and paste as a new layer. Resize 65%. Arrange how you like it. I put mine so the knot in the string is in the middle of the R. Give it a drop shadow of 0, 0, 60, 5.

Copy and paste element 14 from your kit. Mirror if needed and resize down 30%. Arrange so it's sitting on the corner of the top rectangle. See my tag for reference. Give it the same drop shadow as the string. Add any other elements you like, being sure to drop shadow each one.

Copy your main tube and paste as a new layer. Make sure it's on top of your layer palette. Resize if needed, I resized mine down 63%. Arrange on tag where you like it. Give it a drop shadow of -3, 3, 50, 10. Repeat the drop shadow but this time 1, -1, 40, 5.

Activate the white background layer. Copy and paste a paper of choice, I used paper 2. Add mask from image and merge group. Use your raster deform tool to move and drag out if needed so it shows evenly on your workspace. See my tag for reference.

Now if you're going to resize your tag, now is the time to do it. I resized mine 80%, all layers checked.

Now hide the main tube layer for now and activate the string layer. We're going to weave it in and out of the letters and parts of the template. Zoom in about 300% so you can easily see what you're doing.

Using your selection tool, select around a part you want to go underneath part of the template or letter. Make sure you allow for the drop shadow on the string so you don't chop any parts off:


Promote to selection, activate the original string layer and press delete. Move the promoted layer under the template part you want it to be under. So it'll look like this:


Doing this to the letters is a bit more difficult. I'm going to put the part of the string that goes over the C underneath it. So we'll do the same we did before so when we're done it looks like this:


Continue doing this until you have the string woven throughout the tag. See my tag for reference.

Activate the mask layer. Crop layer opaque. Make sure you don't crop off any parts of the main tube, template or drop shadows. You can delete the white background layer now. Activate and unhide your main tube. Add your copyright, license and tagger's mark.

Now's a good time to save a copy of your tag for your blank if you're going to be making tags for others. Just be sure when you add your name you're not doing it on the original file.

Add your name using colors from your tube(s). Give it an inner bevel of choice. I used this one:


Then give it a gradient glow. Normally I'd just do a simple white glow but it just didn't work with these colors so I used this one, with the glow width at 3:


And finally give your name a drop shadow. I used 0, 2, 50, 5.
 
Merge visible and save as a png or merge all and save as a jpg. Congrats, you're done!

Here's a 2nd example. This was my original tag that I did. I remade my example tag as the kit used for this tag is the PUT Bundle pack 223 and so the kit can ONLY be used with PUT tubes. The font used for this tag is Copper AltCaps.


Tuesday, March 24, 2015

Bad Girls - FTU Animated

This tutorial was written by me on 03/24/2015 and assumes you have working knowledge of PSP. Any similarities to other tuts is purely coincidental and not done on purpose.


For this tut you will need:
PSP - I use version X3 but most versions will do
Animation Shop
Tube w/closeup of choice - I'm using the artwork of PinupToons
This tube was the October 2014 bonus tube from CDO
Template by me here
Mask 53 from Moonbeams & Spiderwebs
Filters used:
Eye Candy 5 Textures & Impact
Xero Porcelain
Eye Candy 4000 Glass & Gradient Glow
Font of choice, I used La Portenia de la Boca

Special thanks goes to:
Kiya Sama
for her permission to write this tut as it resembles one of her own

Let's begin, remember to save often.
Open template and your tube, duplicate and close originals. Delete the credit layer on the template.

Please note: Do not use your magic wand to select any of the circle layers since it'll leave them with jagged edges.

We're going to start with layer 1 and work our way inwards. You can change the color of this as we do in future steps but for now let's just leave it black. Apply Eye Candy 5, Textures, Swirl with these settings:


Now activate layer 2. Select all, float, defloat. Add a new raster layer. Flood fill with a medium light color from your tube. I used #c62f2f. Deselect. Delete the original layer. Rename the new flood filled layer Outer Light.

Activate layer 4 and repeat with the same color. Rename this layer Inner Light when you're done.

Activate layer 3. We're going to select it in the same fashion but this time you'll flood fill with a darker color from your tube. I used #700708. Do the same with the layer 5 layer. Rename these Outer Dark and Inner Dark.

So now your layer palette from the bottom up should be raster 1, layer 1, outer light, outer dark, inner light, inner dark.

Activate the outer light layer again. Apply Texture Effects, Weave with these settings:


Apply the same weave effect to the inner light layer and layer 6.

Now activate layer 7. Select as before, new layer and flood fill with a slightly lighter color than your light circles. I used #cb2f2f. Delete the original layer and rename the new layer Center.

Copy your tube closeup and paste as a new layer. Arrange her over the center circle. Resize if needed. Apply Xero, Porcelain at default settings but move the blue slider to 0. Give her a very slight drop shadow at 1, -1, 30, 5.

Activate the center layer again. Select all, float, defloat, invert selection. Activate the closeup tube layer and press delete. Deselect. Change the blend mode to hard light.

Activate the center layer once more. Select all, float, defloat as before. This time expand the selection by 1. Add a new raster layer and move it above the closeup tube layer, flood fill with black. Keep selected. Contract selection by 3. Press delete and now you can deselect. This covers up the edge of the center circle.

Now we're going to add the following drop shadow to only some of the layers. Layer 1, outer light, inner light and layer 6. Apply 0, 0, 100, 15.
Activate outer dark layer. Now you're going to give this one the same drop shadow but this time make sure you check the box to put the shadow on a new layer. Do the same for the inner dark layer.

Activate the outer dark layer again. Duplicate this layer 2 times for a total of 3 layers. Name them from the bottom up: outer dark 1, outer dark 2, and outer dark 3.

Apply the same Swirl as you did for layer 1. Activate outer dark 2, apply the swirl but click on the random seed 1 time. Hide this layer. Activate outer dark 3, apply the swirl, once again clicking on random seed. Hide this layer also.

Now activate the Inner Dark layer. Repeat the same as you did for the outer dark layer, making 3 layers and renaming them. Then apply the filter to each as before.

So now there should be 3 outer dark layers and 3 inner dark layers with the filter applied and a shadow on a separate layer for them both.

Now go up and activate the wordart layer. Select all, float, defloat. Add a new raster layer and flood fill with a dark color from your tube. I used the same dark red as I did the dark circles. Deselect.

Apply Eye Candy 5 Impact Glass. My wordart is red so I clicked on Ruby on the settings tab. The basic tab looks like this: (The glass color is the same color used for the light circles)


Activate the white bottom layer for the wordart and give it a drop shadow, I used -2, 2, 60, 10. Be sure to uncheck the shadow on a new layer box.

Now go down and activate the white raster 1 layer. Add a new layer and flood fill with a color from your tube. I used the same dark red. Add your mask from image, merge group. It's a tad small so resize it up about 107%, make sure all layers is unchecked. While still on the mask layer, crop layer opaque.

Now go back up and activate the top layer in your palette. Copy your full tube and paste as a new layer. Resize as needed, I resized 83%. Arrange her how you like and duplicate this layer. Hide the duplicate and activate the original. Apply the same Porcelain filter as you did the closeup.

Activate and unhide the duplicate, give it a gaussian blur of 2. Change the blend mode to soft light and lower the opacity to about 60%.

Activate the original tube layer. Give it a drop shadow of -3, 3, 60, 10. Repeat with a drop shadow at 1, -1, 50, 5.

Ok if you're going to resize your tag, now is the time to do it. However, resizing in psp causes some of the circle layers to have a ugly edge to them, so we're going to resize in Animation Shop. Make sure your 2nd and 3rd dark circles for both outer and inner are hidden. Copy merged and paste as a new animation in AS.

Back to psp, hide outer and inner dark 1 and unhide the dark 2 layers for both. Copy merged, back to AS and paste AFTER current frame.

Back to psp and this time we're going to hide the dark 2 layers and unhide the dark 3 layers. Copy merged and paste after current frame in AS.

Now in Animation Shop, resize 85%. Click on frame 1, select all, copy and paste as a new image in psp.

All 3 layers will same Frame 1 but don't worry about that, it won't matter. Make sure the top layer is active. Add your copyright, license info and taggers mark. Merge all of your credits onto a single layer. Now duplicate twice. And move them so there's a credit layer on top of each frame layer. Your palette will look like this:


Now merge down each of the credit layers onto the frame layers. So when you're done you'll still have just the 3 frame layers again.

Now with the top layer active again, add your name using chosen font and colors from your tube. I used the same colors as I did for the template.

Convert to raster and give it a glass bevel with Eye Candy 4000 Glass and these settings:
Then give it a slight gradient glow with the glow width at 3:
Then give your name a drop shadow, I used -2, 2, 50, 5.

Now you're going to do just like you did with the credits. Duplicate twice for 3 layers, moving each one so they're on top of each frame:


Merge down each one so you have the just the 3 frame layers again. (Though I have a script that does this for me.) Now you can transfer this to AS two ways. You can copy each layer over as did before. Or you can just save your tag as a psp or psd file. Then open that file in AS.

Either way, once you have it back in AS. Make sure the 1st frame is active. Select all. Alt Enter to bring up the frame properties box. Change the speed to 15. Now save your tag and congrats, you're done.

*Tip, save the 3 frame tag minus your name, what I call an animated blank. Make sure you include in the file name the speed you have to change it to before you fully animate it. This makes it much easier when you have to make tags for others if most of the work is done for you. Also, you can save the full tag before you intially moved it over to AS as a blank also. Remember to save with layers intact (not merged) so if you make a goof it's much easier to go back and fix it.


Saturday, February 7, 2015

Mardi Gras - FTU Forum tag

This tutorial was written by me on 02/07/2015 and assumes you have working knowledge of PSP. Any similarities to other tuts is purely coincidental and not done on purpose.


For this tut you will need:
PSP - I use version X3 but most versions will do
Tube and image of choice - I'm using the artwork of Jasmine Becket-Griffith
 You can purchase this tube at CDO. Do not use this tube without purchasing a license first.
Beads of choice, I used some from a Mardi Gras kit by Randy's Sin
Unfortunately they took their blog down so I can't provide the link
Wordart by RedHeadFalcon
Eye Candy 4000 Gradient Glow
Font of choice, I used Mardi Gras

Let's begin, remember to save often.

Open your template, tube and image in psp, duplicate all and close originals.

On the template delete the info layer, proud member text, thezone text, the glitter edge text and spots layers.

Activate the background layer. Add a new raster layer, select all, copy your image and paste into selection, deselect. Now please note, my image is only slightly smaller then the template so it worked well, if yours isn't you could always use another method to cover the template.

Once you have the white background covered, give it a radial blur at these settings:


Activate the stripes layer. Select all, float, defloat. Activate your blurred layer and promote selection to layer. Deselect and delete the original stripes layer. Change the blend mode of your promoted layer to screen or one that suits your image/colors. Rename this layer stripes.

Activate Wavy Line 1. Use Manual Color Correction to change the grey color to a color from your tube:


Repeat with Wavy Line 2 and Wavy Line 3, changing each to different colors. As you can see on my tag I did purple, green and gold. Give your lines a slight drop shadow. I used 0, 0, 50, 5.

Activate the frame back layer and mirror. Move this layer down to just above your blurred layer. Select all, float, defloat. Activate the blur layer and promote selection to layer. Deselect.

Delete the original frame back layer. Move the promoted layer back up to under the glitter edge frame layer and mirror so it's under the frame again.

Copy your tube and paste as a new layer. Move it over so it's under the frame. Use your raster deform tool to rotate it so it lines up inside the frame. Resize as needed to get it just right. I had to resize mine 60%.

Activate the frame layer. Select all, float, defloat. Add a new raster layer and flood fill with a color from your tube. I used a darker purple. Delete the original frame layer.

Activate the glitter edge layer and I used the manual color correction to change it from white to gold. With this layer still active, give it a drop shadow of 0, 0, 80, 10.

Activate your frame layer. Open some beads of choice from your kit. I used the purple and green beads. Copy the purple beads and paste as a new layer. Do not resize. Copy the green beads and paste as a new layer, mirror. Move the green bead layer down in your layer palette to just above the wavy line 3 layer. Give both the bead layers the same drop shadow you did the glitter edge frame layer.

Activate the top bead layer in your palette. Open your wordart. Copy and paste as a new layer. Resize 15%. Give it a slight white gradient glow with the glow width at 3, I used this:


Give it a drop shadow, I used -2, 2, 50, 5.

Activate the double frame layer. I again used manual color correction to change it from grey to black, but you could do another color if you like.

Add your copyright, license info and tagger's mark.

Add your name using colors from your tube. Give it an inner bevel of choice, I used this one:


Then give it a gradient glow with the glow width at 3. I used the yellow color from the glitter edge frame layer.


Finally, give your name a drop shadow, I used the same as for the wordart.

Merge your tag and save as png or jpg. Congrats, you're done!

Saturday, November 29, 2014

Numbers - PTU Animation

This tutorial was written by me on 11/29/2014 and assumes you have working knowledge of PSP. Any similarities to other tuts is purely coincidental and not done on purpose.


For this tut you will need:
PSP - I use version X3 but most versions will do
Tube of choice - I'm using the artwork of Mashi.
You can purchase this tube at CDO. Do not use this tube without purchasing a license first.
Please note that all Mashi tubes are only available till Dec 26th, 2014
  Animation 27 (Pack 9) by SophisticatSimone, also available at CDO
Animation Shop
Font of choice, I used Gasoline Alley NF
Filters used:
 Mura Meister Copies
Eye Candy 5 Impact
Xero Porcelain
Eye Candy 4000 Gradient Glow

Let's begin, remember to save often.

Open your tube and template in psp. Duplicate both and close the originals.

Working on your template, click on your Bottom Wave Line layer and move it up in your layer palette until it's above the Top Wave layer. Activate the Top Wave Line layer and merge down 1 time. Rename this layer Wave Line. Activate your Top Wave layer and merge down 1 time. Rename this layer Wave.

With your Wave layer active, copy and paste your tube as a new layer. If using same tube as mine, click on the link toggle to change it to none. No clue why this tube has a layer lock:


Apply Mura Meister Copies, Wallpaper rotate at default settings. Apply a Radial Blur at Zoom and strength at 30%. All other options 0.

Activate your Wave layer. Select all, float, defloat. Invert Selection, activate your blurred layer and press delete. Deselect.

Activate your wave Line layer. Select all, float, defloat. Add a new raster layer. Go to selections, Modify, Smooth and apply these settings:


Flood fill with a dark color from your tube. I used black. Deselect. Activate the Wave Line layer again. Press delete on your keyboard 1 time. Activate the flood filled layer and merge down 1 time.

Apply Eye Candy 5 Impact, Glass. Click on the Settings tab and click on Opaque Black with Reflection. Click on the Basic tab. If your line wasn't already black, then click on the Glass Color box and change it back to the color you used. Change Drop Shadow Opacity to 0. Click ok.

Copy and paste your tube as a new layer again. Remember to click the link toggle if needed. Resize as needed. I resized mine 70%. Move it to the left side of the tag. Duplicate your tube. Resize again, I resized mine 90%. Move this duplicated tube over to the right side of your tag and move this layer under the Wave Line layer. Rename this layer small tube.

Now I chose to rotate my tube 15 degrees to the left, this is optional. If you do this be sure to sharpen 1 time. Position your tube on the top part of the Wave. See my tag for reference. When you have it where you like it, duplicate this tube. Hide the duplicate for now.

Now with the original small tube layer active. Click on your selection tool and select around the excess tube that covers the bottom part of the Wave:


Press delete 1 time and deselect. Now activate and unhide the copy of your small tube. Move it down so it's over the bottom part of the wave as you like it. Again, use your selection tool to select and remove the excess above:


Deselect when done and you should have something like this:


Make sure your copy of small tube is active and merge down one time. Activate the Wave layer. Select all, float, defloat. Invert selection, activate your small tube layer and press delete. Deselect. Apply Xero Porcelain at default settings but move the blue slider to 0. Change the blend mode to Multiply and reduce the opacity to 60.

Activate your Wave Line layer. Apply Eye Candy 4000 Gradient Glow with these settings and the glow width at 3:


Activate your main tube layer. Apply the Xero Porcelain again. Give it a drop shadow of 0, 0, 100, 15.

Your main tube should be the top layer in your palette. Add a new raster layer. Select all. Flood fill with black. Contract selection by 1. Keep selected. Add a new raster layer. Flood fill with the same color you used for the Wave Line or white if you used black like I did. Contract by 3. Add a new raster layer again. Flood fill with the black. Contract by 1 again and press delete. Activate the white (or colored layer), press delete and then finally activate the first black layer and press delete. Deselect.

Activate the white (or colored layer) and give it noise at Gaussian, 100% and monochrome checked. Now activate the top black layer and merge down 2 times. Rename this layer border.

Give your border layer the same drop shadow as your tube but change the opacity to 80.

Add your copyright, license info and tagger's mark.

Add your name using colors from your tube. Give it an inner bevel of choice. I used this one:


Then give it a gradient glow, again with the glow width at 3:


Then give your name a drop shadow. I chose to use the same one I did for the border.

Now if you choose not to animate then you can just merge all and save as jpg. Otherwise, continue with instructions below.

Open the psd or mng file for your animation in AS. Select all. Go back to PSP. Hide all layers except Main Background, Black Lines and the original Wave layer. Copy merged and paste as a new animation in AS. Now our animation has 13 frames so our tag must have 13 frames as well.

Hold down ctrl and shift and press L repeatedly until you have 13 frames of your tag. Go back and click on the 1st frame. Select all.

Now click on the first frame of your animation and drag it onto the first frame of your tag. Drop it into place in the middle of the tag. If you goof you can undo both and try again, just making sure that both have all frames selected.

Once you have your animation placed go back to psp and click on Layers, View, Invert. Copy merged and paste as a new animation in AS.

Make sure you have Propagate Paste turned on, if you're unsure you can find it under Edit.

Now again your tag with the animation should have all layers selected with the 1st frame being highlighted. Click on the newly pasted frame with the top parts of your tag and drag and drop onto the first frame of your animated tag. You might have to undo and redo a few times to get it to be lined up just right.

Save your tag as a gif and congrats, you're done!