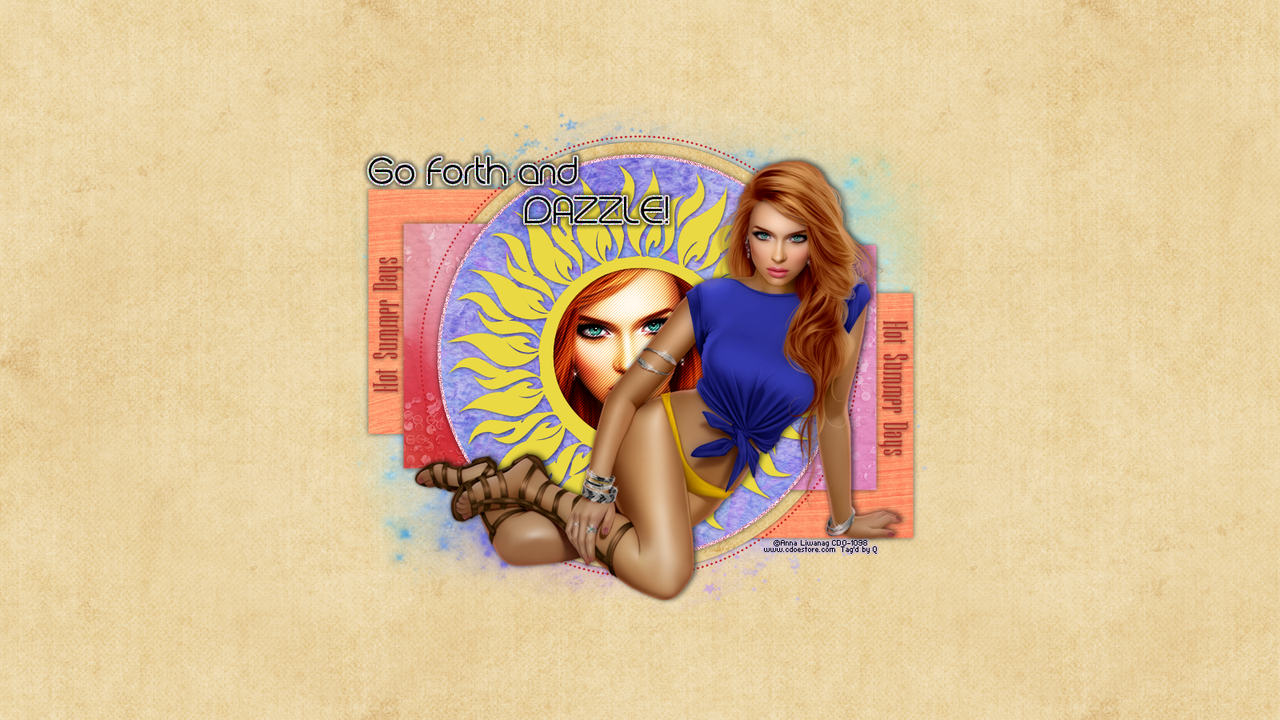
Showing posts with label Incredimail stats. Show all posts

Friday, September 21, 2018

Fall Fiesta - New Wallpaper and Incredimail Letter

I made this tag last week and now I'm sharing a matching Incredimail Letter and wallpaper in 2 sizes. Click the previews to download.


Saturday, July 14, 2018

New wallpaper & Incredimail Letter


Hello, I made this tag today and made a matching Incredimail letter and wallpaper in 2 sizes, 1600 x 900 and 1920 x 1080.  Click the previews below to download.


Thursday, May 24, 2018

Elegant Rose - Extras, Incredimail Stat & Wallpaper


I made this tag last night, and today decided to make a bunch of extras and stuff. So click on the images to download. You can find a matching wallpaper HERE.

Extras


Incredimail Stat


Sunday, April 22, 2018

Pirate Booty - PTU Scraps

This tutorial was written by me on 04/21/2018 and assumes you have working knowledge of PSP. Any similarities to other tuts is purely coincidental and not done on purpose.
For this tut you will need:

PSP - I use version X9 but most versions
Tube of choice, I'm using the art of PinupToons, you can find this tube at CDO
Do not use this tube without purchasing a license first
Scrap kit of choice, I'm using this pirate themed kit by Creative Scraps by Crys 
You can find this kit at Mystical Scraps here
Mask of choice. I'm using DD_GeoMask2, you can find it on Dee's blog here
Font of choice, I used Pirouette LT Std
Filters used:
Xero Porcelain
Eye Candy 4000 Gradient Glow

Let's begin, don't forget to save often.

Open a new workspace, 800 x 800. We'll resize later. Flood fill with white. Copy frame 2 and paste as a new layer. Rename this layer Frame.

Open paper 7, paste a new layer, move below your frame. Rename this layer frame bg. Move the paper down so you see just the darker blue and the lighter blue inside the frame. Duplicate, change blend mode to Modify and merge down. Activate your frame layer, click inside with your magic wand. Expand by 5, invert selection. Activate your paper layer and press delete. Deselect. Activate your frame and give it a shadow of 0, 0, 80, 10.

Open Element 31, copy and paste as a new layer, make sure this layer is below your frame. Rename this layer boat. Arrange down near the bottom of the frame, see my tag for reference. Give your boat a drop shadow of -2, 0, 60, 10. Use your selection tool to remove any portion of the boat that sticks outside of the frame.

Activate your frame layer. Open your tube, copy and paste as a new layer. Resize if needed. Arrange on the boat. I placed mine so it looks like she's reclining in/on the boat. Rename this layer tube.

****

If your tube goes slightly over the boat edge like mine does then follow the instructions below. If it doesn't, skip this section and move on to the next one. Lower the opacity of the tube to about 30%. Zoom in about 400% so you can see the place where the tube overlaps really well. Make sure your boat layer is active. Using your freehand selection tool, set to point to point. Very carefully draw around the area on the boat that you want to be on top of the tube:

Promote selection to layer. Rename boat front. Deselect. I did this with the oar handle as well. You can also give these promoted sections the same shadow as you did the boat but make sure the shadow is on a new layer. Then use your erasor tool to move any part of the shadow you don't want to show up. Be sure to return the opacity on the tube to 100%.

****

Make sure your tube is active and duplicate. On the original apply Xero, Porcelain with default settings but move the blue slider to 0. On the copy, give it a gaussian blur of 2, change blend mode to soft light and reduce the opacity to 70%. Activate the original tube layer and give her a drop shadow of -1, 4, 60, 10. Repeat the drop shadow at 1, -1, 40, 2.

Open element 14. Paste as a new layer. Rename this layer island. Move above your frame bg layer. Duplicate and move the duplicate down so the water part covers the bottom part of the frame under the boat. Move the duplicate under the original island layer and change the blend mode to Luminance Legacy. Activate the original island layer, resize 80%, all layers unchecked. Arrange so you can see the island above the top of the boat, as if it was off in the distance.

Hide all layers except island, copy of island, and frame bg layers. Zoom in about 200%. Make sure your original island layer is active. Draw a narrow selection along the edge of the water on one side of the island:


Selections, Modify, Feather selection by 10. Press delete twice and deselect. Repeat with the water on the other side of the island. Zoom back out to 100%. Layers, View, All layers. Now the island water blends in with the "sky" in the frame bg instead of there being a harsh line. Use your selection tool to remove any part of copy of island that sticks out from the frame.

Make sure the top layer in your palette is active. It's time to add the rest of our elements. See my tag for placement. Drop shadow is 0, 3, 50, 10. All elements are drop shadowed the same. When you resize, make sure all layers is unchecked.

Element 15, 80%.
Element 25, 70%.
Element 26, 40%.
Element 7, 30%, mirror and rotate 40 to the left.
Element 4, 35%.
Element 19, 30%.
Element 16, 40%, rotate 25 to the right.
Element 13, 45%.
Element 9, 75%, mirror, arrange under the tube and erase any part of the chain you can see behind the tube.
Element 11, 35%.

Add any other elements of choice. Hide the white background layer, crop merged opaque. Now is the time to resize your tag, I resized mine down 60%, all layers checked. Increase canvas size to 600 by 500, center placement.

Activate and unhide the white background layer. Open paper of choice. I used paper 2. Copy and paste as a new layer. I resized mine down 75%, all layers unchecked, but this is optional. Add mask from image. Merge group and resize 85%. Move it so it sits more centered behind your tag. Delete the white background layer and crop merged opaque once more.

Add your copyright, license number and tagger's mark. Don't forget to credit the scrap kit if required.

Add your name using font of choice, foreground and background from your tube/tag. Give it a fat white glow with the glow width at 3, but move the second slider in closer so it sits right on top of the box for the foreground color. Finally drop shadow your name. I used 0, 2, 50, 5.

Merge visible and save as a png or merge all and save as a jpg. Congrats, you're done!

I also have a matching Incredimail Letter and Wallpaper in 2 sizes. Click the preview below to download the letter and click HERE to preview and download the wallpaper.


Friday, April 13, 2018

CT Tags - Freeks Creations - Clover Crazy


2 tags to show off today featuring this clover packed kit by Freeks Creations. You can find this kit at Mystical Scraps here

Yes I realize that I am posting St. Patrick's Day tags in April but I had very limited computer usage during February and March. 

I paired this kit with the art of Anna Liwanag. You can find this tube at CDO here.


And with the art of VeryMany. You can find it on her site here.


There is also Incredimail letters matching both tags. Click the previews below to download.


Thursday, April 12, 2018

Mr. Bond - Old School

This tutorial was written by me on 04/11/2018 and assumes you have working knowledge of PSP. Any similarities to other tuts is purely coincidental and not done on purpose.


For this tut you will need:

PSP - I use version X9 but most versions will do
Tube of choice with matching image, I'm using the art of Dave Nestler, available at CDO
Do not use this tube without purchasing a license first
Mask of choice, I'm using WSL_Mask84, you can find all of her masks available for bulk download on her blog here
Fonts of choice, I'm using 2 Peas Blueberry Pie, 2 Peas Fancy Free, Panda Tired Script
Filters used:
Xero Porcelain
Penta.com Dot and Cross
Mura Meister Copies
Eye Candy 4000 Gradient Glow

Let's begin, don't forget to save often.

Open your tube and matching image in psp. Duplicate both and close originals. On the image, promote background to layer, increase canvas size to 600 x 600, center placement. Rename this layer bg. Add a new raster layer and flood fill white. Send the white layer to the bottom.

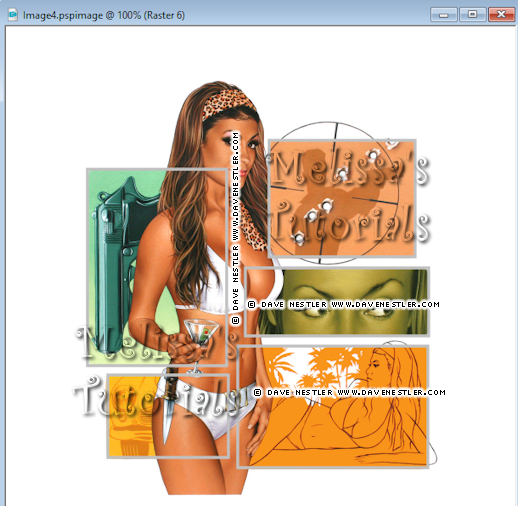
Activate your bg layer. Click on your rectangle shape tool. Line style solid, width 4, foreground to a color of choice, I used #c0c0c0, background null. You're going to draw a rectangle around each section on your image. So starting with the section with the bullet holes, it'll look like this:


Use the vecter nodes to adjust your rectangle if needed. Convert to raster when you finish. Repeat with the other sections. I drew most of my rectangles from top left to bottom right. If the main image (tube) is covering part of a section, then draw from bottom right to top left and just imagine where it might end, don't worry if you go over the tube part as it'll get covered.


When you get all of your sections done, it should look like this:


Now hide the white layer and the bg layer. Merge visible on all of your rectangles. Rename this layer boxes. Unhide your other two layers.

Using your magic wand, set to Add, RBG Value, tolerance and feather both at zero. Click inside each box. Expand by 2. Invert selection. Activate the bg layer and press delete. Deselect. You should now have something like this:


Duplicate your bg layer two times for a total of 3 layers. Move one of the copies down just above the white layer, rename mask and hide for now. Working on the original bg layer, apply Xero Porcelain with default settings but move the blue slider to 0. On the copy of bg, give it a gaussian blur of 2. Change the blend mode to overlay. Activate the boxes layer. Add noise at Uniform, 40%, monochrome checked. Then give it a drop shadow. I used 0, 0, 50, 5, all layers unchecked.

Copy your tube and paste as a new layer. Line her up with the image on the bg, I used the elbow for placement. Rename this layer tube. Duplicate your tube. On the original, apply Porcelain with the same settings. Activate the copy of your tube. Give it the same gaussian blur, but change the blend mode on this one to soft light. Activate the original tube layer. Give it a drop shadow, I used 0, 3, 60, 10. Repeat the drop shadow at 1, -1, 40, 2.

Make sure the top layer in your palette is active. Click on your ellipse shape tool. Same settings as before but change your foreground color to one of choice, I used #a0f5bf. Hold down the shift key and draw out a circle a little bigger than the area with your boxes. See my tag for reference. Use the vector nodes to adjust if needed. When happy with your circle convert to raster. Apply noise with the same settings as before. Rename this layer circle border. Keep it at the top of your layer palette for now. 

Click inside the circle with your magic wand. Expand by 2. Add a new raster level. Flood fill with the same color you used for the circle. Deselect. Rename this layer circle bg. Apply Penta.com Dot and Cross with default settings. Move this below the original bg layer. Activate the circle border layer, give it the same drop shadow you did the boxes.

With the circle border layer still active, zoom in about 400%, draw a selection around the part of the circle that goes over the tube.


Promote selection to layer. Activate the circle border layer and press delete. Deselect. Activate the blurred tube layer. Using your freehand selection tool and still zoomed in, carefully draw along the circle and around the part of the tube that sticks out below the circle.

Press delete, activate the original tube layer, delete once more and deselect.

Move the circle border layer down to above the circle bg layer. Activate and unhide the mask layer. Apply Mura Meister Copies, Wallpaper Rotate. Give it a gaussian blur of 10. Add mask from image, and merge group. Resize the mask about 105%, all layers unchecked. I used the raster deform tool to stretch it out and move it down a bit so you see more of it to the sides and below the circle. See my tag for reference.

Activate the top layer in your palette. Click on your text tool, I used the 2 Peas Blueberry Pie font. Create as vector, foreground null, background white. Type out Mr. Bond. Convert to raster. Give it a drop shadow of 0, 3, 50, 5. See my tag for placement. Rename this layer Mr Bond.

The rest of the text we're going to add one word at a time. See my tag for placement of each word. Change your font to something different. I used 2 Peas Fancy Free. You can use the same color or change to a color that matches your tag. Let's do the word 'I've'. Convert to raster when you're happy with it and give it the same drop shadow. Don't forget to rename each layer with the word you added. For the word 'expecting' you might have to change the size of the font to get it to fit properly. All of my words with this font were size 48, except 'expecting' I did at 45. 

Delete the white background layer, crop merged opaque. If you want to resize your tag, now is the time. I resized mine 85%, all layers checked. Make sure the top layer in your palette is active. Add your copyright info, license and tagger's mark.

Change your font to one for your name. I used Panda Tired Script, color to match your tube/tag, I used #a88e13. Add your name, convert to raster and give it a slight inner bevel:


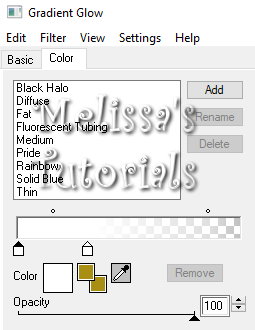
Then apply a gradient glow using these settings and the glow width at 3.


Finally drop shadow your name using the same shadow as before but change the horizontal to 2.

Merge visible and save as a png or merge all and save as a jpg. Congrats, you're done!

I made a matching Incredimail Stat to go with the tag, you can download it by clicking on the preview below.


Sunday, January 21, 2018

Dare to Dream - PTU Scraps

This tutorial was written by me on 01/21/2018 and assumes you have working knowledge of PSP. Any similarities to other tuts is purely coincidental and not done on purpose.


For this tut you will need:
PSP - I use version X6 but most versions will do
Tube of choice, I'm using the art of Barbara Jensen
Do not use this tube without purchasing a license first
Scrap kit of choice, I'm using an IB kit from Creative Scraps by Crys, available at CDO
Mask of choice, I'm using DD_GeoMask_3
Font of choice, I'm using MADE GoodTime Script
Filters used:
Xero Porcelain
Xero Radiance
Eye Candy 4000 Gradient Glow

Let's begin, don't forget to save often.

Open Frame2a, duplicate and close the original. Increase canvas size to 700 x 600, placement center. Rename this layer Frame. Add a new raster layer, flood fill white and send to the bottom.

Activate the frame layer. Click on your selection tool, draw a selection a little larger then the inside of the frame:


Open a paper of choice, I'm using paper 5. Duplicate, close the original. Resize so it's a little bigger then the selected section of your frame. I resized mine 60%. Copy and paste as a new layer on top of your frame. Move this layer under the frame layer, invert selection and press delete. Deselect. Rename this layer Frame Back.

Activate your frame layer again. Give your frame a drop shadow of 0, 0, 60, 15. Copy your tube and paste as a new layer, resize if needed. Arrange your tube how you want it to sit. Duplicate this layer, hide the duplicate for now and we're working on the original. Apply Xero Porcelain with default settings but move the blue slider to 0. Unhide and activate the copy of the tube. Apply Xero Radiance with default settings. Change the blend mode on this layer to Soft Light with Opacity at 80%. These settings work with this tube that I am using, different settings might work better with your chosen tube.

Activate the original tube layer and give it a drop shadow of 0, 2, 60, 10. Give it a second drop shadow of 1, -2, 50, 5.

Activate your frame layer. Now let's add our elements. Open Leaves, copy and paste as a new layer. Resize 70% all layers unchecked, mirror and place on the left side of the frame. Rename this layer Leaves 1. Open Leaves 2, copy and paste as a new layer. Resize 75%, mirror and place on the right side of your frame and move down below the Frame Back layer. See my tag for placement. Rename this layer Leaves 2.  Drop shadow both leaves layers 0, 2, 50, 5.

Activate the top layer in your palette. Open the Flowers element, copy and paste as a new layer. Resize 60%. Rotate 40 to the right. Place on the left side of the frame and move this layer so it's sitting on top of Leaves 1. Arrange it how you like it and give it the same drop shadow as before. There was a little bit of the stem sticking out below my tube's head, so I just used the selection tool to get rid of it. Rename this layer Flowers.

Open Vines. Copy and paste as a new layer. Resize 60, rotate 60 to the right. Place on the right size of the frame, under the original tube layer. Rename Vines and give same drop shadow.

Open Birdcage. Copy and paste as a new layer. Resize 70%. Arrange in the middle of the frame, just above the frame layer. You want the top sticking up quite a bit above the top of the frame. See my tag for reference. Same drop shadow. Rename this layer Birdcage.

Open Ribbon. Copy and paste as a new layer. Flip this layer, arrange at the bottom of your tag, under the original tube layer. Same drop shadow. Rename Ribbon.

Open Wordart. Copy and paste as a new layer. Resize 75%. Arrange near the top of the tag but under the original tube layer, see my tag for reference. Apply Eye Candy 4000, Gradient Glow with a Fat white glow. Give it the same drop shadow but change the vertical to -2.

Hide the white background layer. Click on your crop tool and crop Merged Opaque. Increase the canvas size to 700 by 600 again. You can now unhide the white layer and flood fill again if desired. Make sure this white layer is active.

Open a paper of choice, I'm using paper 2. Copy and paste as a new layer. Add Mask from image. Source Luminance and invert mask data unchecked. Merge group. Delete the white layer and crop Merged Opaque once more.

If you're going to resize your tag, now is the time to do it. I resized mine 80%, all layer checked.

Activate the top layer in your palette. Add your artist credits, license, scrap credits if required and watermark. If you like to make a blank so you can add multiple names later, then save it now with layers fully intact. I save mine as a psd file. Then duplicate and we'll be adding a name to the duplicate tag so we don't accidently save over the original.

Add your name using chosen font. Make the background a color from your tag/tube. I chose to leave my foreground null but you might do different depending on your font. When you get your name placed where you like it, give it an Inner Bevel:


Then give it a Gradient Glow, I used these settings with the glow width at 3.


Then give your name a drop shadow. I used 0, 2, 50, 5.
Merge visible and save as a png or merge all and save as a jpg. Congrats, you're done!

I have created a matching wallpaper, you can download that HERE and a matching Incredimail Stat. Click the preview below to download.

https://www.4shared.com/file/JiJPeO3tca/bjdaretodream.html


Saturday, March 12, 2016

CT for Monti's Scraps - Lots of goodies


This is a CT tag for Monti's Scraps. The scrapkit is called SteamPinked and is just gorgeous.


I used a template by Rosa Tags. And paired with this lovely Steampunk tube by Alehandra Vanhek. It's an exclusive so you can only get it if you're a member of their exclusive club. I made Extras, 2 Incredimail letters and wallpaper, you can preview and download that HERE. Click the images below to download everything else.

http://public.fotki.com/Queina/extras/pfd/avsteampink/

http://www.4shared.com/file/KJY_xKhQba/avsteampink.html

http://www.4shared.com/file/0lvViDt2ce/avsteampinksb.html

Friday, January 22, 2016

VeryMany - Extras, Wallpaper & Incredimail Letter

So a friend of mine, posted this tut. My tag is based on that, but I just couldn't resist adding more scrap elements. Unfortunately, this kit is retired or I'd so totally give you the link to Dee's store.

But I have lots to share. There's extras, a matching Incredimail letter and wallpaper available HERE. Click on preview below to download.